Rearranging Rows of Data with the ListView Control.
In the earlier part of this tutorial, we explored how to rearrange columns in the ListView by enabling the AllowColumnReorder option on the Property Sheet.
However, rearranging rows (list items) works differently. Rows can be relocated by dragging and dropping them onto another row. To enable this functionality, we must first activate the OLEDragMode / OLEDropMode options of the ListView control on the Property Sheet.
But enabling these options alone is not enough—VBA code is required to complete the drag-and-drop operation and actually rearrange the items into the desired order.
To demonstrate this, let us build a sample Access Form with the required controls and VBA code. The form will include:
-
A ListBox to display item indexes,
-
A ListView control with sample data,
-
VBA code to handle the drag-and-drop sequence and rearrange the rows accordingly.
A sample image of the form, featuring ListBox and ListView controls, is shown below.
We have created a ListBox that displays all the Tables and Queries (excluding Action Queries) from the database.
When you select an item from the listbox, the corresponding records are instantly displayed on the ListView control, in the same way they appear in Datasheet View.
The Design Task.
Step-by-Step Setup
-
Create the Source Table
-
Create a new table with a single Text field, and name it DataList.
-
Save the table as lvTables (here, lv stands for ListView).
-
Open the table in Datasheet View and add a few table names and Select Query names from your database.
-
(Example: I used tables imported from the Northwind sample database.)
Note: The Attachment field type is not supported in the ListView control. For tables containing attachments, create a Select Query that includes all fields except the attachment field.
-
Create the Form Layout
-
Open a new form in Design View.
-
Insert a ListBox control.
-
Set its Name property to List0.
-
Change the label’s caption to 'Tables'.
-
In the Property Sheet, set:
-
Insert a ListView control from the ActiveX Controls list.
-
Insert a Label above the controls.
-
Insert a Command Button below the controls.
-
Configure the ListView Control
-
Right-click on the ListView control → highlight ListViewCtrl Object → select Properties.
-
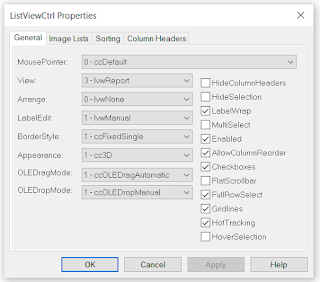
On the General Tab, adjust the settings to match the sample image provided below.
Some of these options we have already set in the earlier sessions. Here we need the following options for our Drag and Drop action:
OLEDragAutomatic - 1
OLEDropManual - 1
FullRowSelect - True
HotTracking - True
Ensure that the above settings match your property sheet, then save the Form.
Display the VBA Module of the Form.
The Form Module VBA Code.
Copy and paste the following VBA Code into the Form Module, overwriting the existing Code Lines, if any:
Option Compare Database
Option Explicit

Dim lvwList As MSComctlLib.ListView
Dim strTable As String
Dim db As DAO.Database
Dim rst As DAO.Recordset

Private Sub Form_Load()
    Set lvwList = Me.ListView1.Object

End Sub


Private Sub Form_Unload(Cancel As Integer)
On Error GoTo Form_Unload_Err
Dim lvItem As ListItem
Dim tmp As Long
Dim criteria As String
Dim strfield As String
Dim flag As Boolean
Dim fld As String

If strTable = "" Then
Set lvwList = Nothing
    Exit Sub
End If

Set db = CurrentDb
Set rst = db.OpenRecordset(strTable, dbOpenDynaset)
flag = False
For Each lvItem In lvwList.ListItems
    tmp = lvItem.Index
    strfield = lvwList.ColumnHeaders(1).Text
    criteria = strfield & " = " & Chr(34) & lvItem.Text & Chr(34)

    rst.FindFirst criteria

    If Not rst.NoMatch Then
       If (rst.Fields(strfield).Value = lvItem.Text) _
       And (rst.Fields(1).Value = tmp) Then
         'GoTo nextitem
       Else
            rst.Edit
            rst.Fields(1).Value = tmp
            rst.Update
       End If
    Else
        MsgBox "Item: " & tmp & " Not Found!"
    End If
Next
rst.Close

Set lvwList = Nothing
Set lvItem = Nothing
Set rst = Nothing
Set db = Nothing

Form_Unload_Exit:
Exit Sub

Form_Unload_Err:
MsgBox Err & " : " & Err.Description, , "Form_Unload()"
Resume Form_Unload_Exit

End Sub

Private Sub ListView1_ColumnClick(ByVal ColumnHeader As Object)
' When a ColumnHeader object is clicked, the ListView control
' sorts the data of that column. On the first Click on the Column
'will sort in Ascending Order, second Click will sort in Descending
With Me.ListView1
    ' Set the SortKey to the Index of the ColumnHeader - 1
    .SortKey = ColumnHeader.Index - 1

' Set Sorted to True to sort the list.
 If .SortOrder = lvwAscending Then
    .SortOrder = lvwDescending
 Else
    .SortOrder = lvwAscending
 End If

    .Sorted = True
End With

End Sub

Private Sub List0_Click()

strTable = List0.Value

Call LoadListView(strTable)

End Sub

Private Sub LoadListView(ByVal s_Datasource As String)
On Error GoTo LoadListView_Err
    Dim j As Integer
    Dim tmpLItem As MSComctlLib.ListItem
    Dim strHeading As String

    strHeading = UCase(s_Datasource)
    With Me.Heading
        .caption = strHeading
        .FontName = "Courier New"
        .FontSize = 20
        .FontItalic = True
        .FontBold = True
    End With

   'Initialize ListView Control
    lvwList.ColumnHeaders.Clear
    lvwList.ListItems.Clear

    Set db = CurrentDb
    Set rst = db.OpenRecordset(s_Datasource, dbOpenSnapshot)

    'Initialize ListView & Column Headers Property Values
     With lvwList
        .Font.Size = 10
        .Font.Name = "Verdana"
        .Font.Bold = False
        .GridLines = True
    End With

    With lvwList
        'Syntax: .ColumnHeaders.Add Index, Key, Text, Width in Pixels, Alignment, Icon
       For j = 0 To rst.Fields.Count - 1
        .ColumnHeaders.Add , , rst.Fields(j).Name, IIf(j = 0, 3000, 1400), 0
       Next
    End With
   Dim I As Long
    rst.MoveFirst
    Do While Not rst.BOF And Not rst.EOF
    'Syntax: lvwList.ListItems.Add Index, Key, Text, Icon, SmallIcon
        Set tmpLItem = lvwList.ListItems.Add(, , rst.Fields(0).Value) 'Name column

         'Syntax: tmpLItem.ListSubItems.Add Index, Key, Text, ReportIcon, ToolTipText
          With tmpLItem
                For j = 1 To rst.Fields.Count - 1
                    .ListSubItems.Add , , Nz(rst.Fields(j).Value, "")
                Next
          End With
        rst.MoveNext
    Loop
    rst.Close

    With lvwList
        If .ListItems.Count > 0 Then
            .ListItems(1).Selected = True
        End If
    End With

    Set db = Nothing
    Set rst = Nothing

LoadListView_Exit:
Exit Sub

LoadListView_Err:
MsgBox Err & " : " & Err.Description, , "LoadListView()"
Resume LoadListView_Exit
End Sub


Private Sub ListView1_OLEDragOver(data As Object, Effect As Long, Button As Integer, Shift As Integer, x As Single, y As Single, State As Integer)
    'Highlight the item when draged over it
    Set ListView1.DropHighlight = ListView1.HitTest(x, y)

End Sub

Private Sub ListView1_OLEDragDrop(data As Object, Effect As Long, Button As Integer, Shift As Integer, x As Single, y As Single)

'Item being dropped
Dim lvwDrag As ListItem
'Item being dropped on
Dim lvwDrop As ListItem
'Item being readded to the list
Dim lvwTarget As ListItem
'Subitem reference in dropped item
Dim lvwSub As ListSubItem
'Drop position
Dim intTgtIndex As Integer
Dim j As Integer

Set lvwDrop = lvwList.HitTest(x, y)
Set lvwDrag = lvwList.SelectedItem 'save a copy of draged item

'Ignore overlapping drag or drop Item actions
If (lvwDrop Is Nothing) Or (lvwDrag Is Nothing) Or (lvwDrop = lvwDrag) Then
    Set lvwList.DropHighlight = Nothing
    Set lvwDrop = Nothing
    Set lvwDrag = Nothing
    Exit Sub
End If

'Save the droped position Index Number
intTgtIndex = lvwDrop.Index
'Remove Dragged Item from its old position
lvwList.ListItems.Remove lvwDrag.Index

'For j = intTgtIndex To ListItems.Count

'Creates a new Item in the Target Item position
'with the Dropped Item Index Number and Dragged Item.Text.
'Saves the new Item reference in lvwTarget Item.

'* The original Droped-on Target) Item will be moved down
'* by incrementing its original Index Number
Set lvwTarget = lvwList.ListItems.Add(intTgtIndex, , lvwDrag.Text)

'Copy the original Draged Item's subitems to the new item
If lvwDrag.ListSubItems.Count > 0 Then
    For Each lvwSub In lvwDrag.ListSubItems
        lvwTarget.ListSubItems.Add , lvwSub.Key, lvwSub.Text
    Next
End If

'Highlight the draged item in its new position
lvwTarget.Selected = True

'Destroy all objects
Set lvwTarget = Nothing
Set lvwDrag = Nothing
Set lvwDrop = Nothing
Set lvwList.DropHighlight = Nothing

End Sub

Private Sub cmdClose_Click()
    DoCmd.Close acForm, Me.Name
End Sub
You are already familiar with most of the VBA code, except for the newly added procedures:
-
ListView1_OLEDragOver()
-
ListView1_OLEDragDrop()
-
Form_Unload()
-
ListView1_ColumnClick()
The first two procedures handle the drag-and-drop functionality, allowing a ListItem (row) to be dragged and placed in a new location. The Form_Unload() and ListView1_ColumnClick() procedures are used to sort the ListItems.
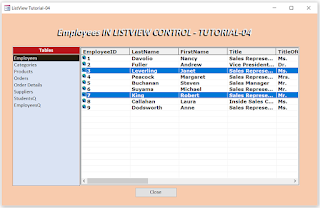
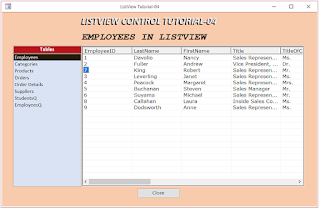
The images below illustrate the drag-and-drop process:
-
In the first image, the ListItem with EmployeeID = 7 is dragged upward by the user and dropped onto the ListItem with EmployeeID = 3.
-
In the second image, the ListItem is moved in the reverse order.
-
As the mouse pointer moves over the rows during the drag operation, each row between the source and target items is highlighted in sequence, providing a clear visual cue of the drop location.
The Drag and Drop Action in Pictures.
The row with Employee ID 7 is dropped on the Item, with Employee ID 3 above.
The VBA Code Segment-wise Analysis.
In an item selected from the ListBox, the List0_Click() event procedure runs and loads the records in the ListView Control.
Private Sub List0_Click()
Dim strTable As String

strTable = List0.Value

  Call LoadListView(strTable)

End Sub
The selected Table or Query name is stored in the strTable string variable. This variable is then passed as a parameter to the LoadListView() subroutine. We have already reviewed this procedure in earlier sessions. If you would like to revisit those explanations, please refer to the links provided at the bottom of this page. You may also notice a few minor adjustments that I have made to the code in this episode.
In this example, we have not used the ImageList Control. Consequently, the Icon, SmallIcon parameter values in the ListItems.Add() method, as well as the ReportIcon and TooltipText parameters are also not applied.
Now, let us turn our attention to the drag-and-drop functionality. Specifically, we will examine how the VBA code within the ListView1_OLEDragOver() and ListView1_OLEDragDrop() procedures work.
The ListView1_OLEDragOver() Procedure.
Private Sub ListView1_OLEDragOver(Data As Object, Effect As Long, Button As Integer, Shift As Integer, x As Single, y As Single, State As Integer)
    'Highlight the item when draged over it
    Set ListView1.DropHighlight = ListView1.HitTest(x, y)
End Sub
This procedure is executed automatically when you click and hold on a row, then start dragging it across the ListView control. As the dragged row passes over other rows on the way to the target position, each row beneath the pointer is highlighted in turn.
The function ListView1.HitTest(x, y) is used to read the current mouse pointer coordinates (x, y). Based on these coordinates, it determines which row of the ListView control is currently under the pointer and highlights that row.
This process continues as you move over additional rows until you finally release the mouse button on the chosen target row. At this point, the drop action triggers the ListView1_OLEDragDrop() procedure that executes the code necessary to reposition the source row into its new location.
The ListView1_OLEDragDrop Procedure.
Private Sub ListView1_OLEDragDrop(Data As Object, Effect As Long, Button As Integer, Shift As Integer, x As Single, y As Single)

'Item being dragged
Dim lvwDrag As ListItem
'Item being dropped on
Dim lvwDrop As ListItem
'Item being added to the list
Dim lvwTarget As ListItem
'Subitem reference used in For . . .Next loop
Dim lvwSub As ListSubItem
'Drop position index
Dim intTgtIndex As Integer

Set lvwDrop = lvwList.HitTest(x, y) 'save the source item
Set lvwDrag = lvwList.SelectedItem 'save a copy of draged item

'Ignore overlapping drag or drop Item actions
If (lvwDrop Is Nothing) Or (lvwDrag Is Nothing)  Or (lvwDrop = lvwDrag) Then
    Set lvwList.DropHighlight = Nothing
    Set lvwDrop = Nothing
    Set lvwDrag = Nothing
    Exit Sub
End If

'Save the droped position Index Number
intTgtIndex = lvwDrop.Index

'Remove Dragged Item from its old position
lvwList.ListItems.Remove lvwDrag.Index

'Creates a new Item in the Target Item position
'with the Dropped Item Index Number and Dragged Item.Text.
'Saves the new Item reference in lvwTarget Item.

'* The original Droped-on Target) Item will be moved down
'* by incrementing its original Index Number
Set lvwTarget = lvwList.ListItems.Add(intTgtIndex, , lvwDrag.Text)

'Copy the original Draged Item's subitems to the new item
If lvwDrag.ListSubItems.Count > 0 Then
    For Each lvwSub In lvwDrag.ListSubItems
        lvwTarget.ListSubItems.Add , lvwSub.Key, lvwSub.Text
    Next
End If

'Highlight the draged item in its new position
lvwTarget.Selected = True

'Destroy all objects
Set lvwTarget = Nothing
Set lvwDrag = Nothing
Set lvwDrop = Nothing
Set lvwList.DropHighlight = Nothing

End Sub
Let us now review this procedure in detail, breaking it down into smaller sections to understand its functionality.
The first part of the code declares the necessary object variables that will be used to handle the drag-and-drop action within the ListView control:
'Item being dragged
Dim lvwDrag As ListItem
'Item being dropped on
Dim lvwDrop As ListItem
'Reference of the Item being added to the list
Dim lvwTarget As ListItem
'Subitem reference used in For . . .Next loop
Dim lvwSub As ListSubItem
'Drop position index
Dim intTgtIndex As Integer

Set lvwDrop = lvwList.HitTest(x, y)
Set lvwDrag = lvwList.SelectedItem 'save a copy of draged item
In this procedure, the first three temporary ListItem objects are declared, each serving a distinct role in the drag-and-drop process:
-
lvwDrag – Holds a copy of the row being dragged to a new location.
-
lvwDrop – Stores a reference to the row on which the dragged item will be dropped.
-
lvwTarget – Points to the newly created ListItem after the source row is removed from its original location and re-inserted at the target position.
Additionally, the lvwSub variable is declared as a sequencing object. It is used in the For...Next loop to cycle through all ListSubItems (columns from the 2nd onward) of the dragged row. Even though the original ListItem is deleted during the process, a complete copy of it is preserved in lvwDrag, allowing its sub-items to be transferred one by one.
The target index is stored in the intTgtIndex variable, which captures the position of the ListItem where the dragged row will be re-inserted.
To determine this position, the function lvwList.HitTest(x, y) reads the current mouse coordinates over the ListView control. It identifies the target ListItem and assigns it to the lvwDrop object.
Since a row must be selected before it can be dragged, the lvwList.SelectedItem property value is set to True. Using this property, a copy of the selected ListItem is made into the lvwDrag object.
The next code segment then validates both the source (lvwDrag) and target (lvwDrop) objects before proceeding with the row rearrangement.
Validation Checks on the Drag-Drop Action.
'Ignore overlapping drag or drop Item actions,
'OR drag and drop happens on the same ListItem.
If (lvwDrop Is Nothing) Or (lvwDrag Is Nothing)  Or (lvwDrop = lvwDrag) Then
    Set lvwList.DropHighlight = Nothing
    Set lvwDrop = Nothing
    Set lvwDrag = Nothing
    Exit Sub
End If
This code segment validates the drag-and-drop action before any changes are made.
If the drag operation does not begin or end on a valid item, either the lvwDrag or lvwDrop object (or both) will be empty. Another invalid scenario occurs when the user starts to drag a row but then drops it back onto the same row—effectively making no change.
In such cases, the procedure detects the invalid move and terminates execution immediately, preventing errors or unnecessary processing.
If the validation passes, the program proceeds to the next section of code, where the rows in the ListView are rearranged according to the drag-and-drop action.
'Save the dropped position ListItem Index Number
intTgtIndex = lvwDrop.Index

'Remove Dragged Item from its old position
lvwList.ListItems.Remove lvwDrag.Index

'Creates a new Item in the Target Item position
'with the Dropped Item Index Number and Dragged Item.Text.
'Saves the new Item reference in lvwTarget Item.

'* The original Droped-on Target) Item will be moved down
'* by incrementing its original Index Number
Set lvwTarget = lvwList.ListItems.Add(intTgtIndex, , lvwDrag.Text)

'Copy the original Draged Item's subitems to the new item
If lvwDrag.ListSubItems.Count > 0 Then
    For Each lvwSub In lvwDrag.ListSubItems
        lvwTarget.ListSubItems.Add , lvwSub.Key, lvwSub.Text
    Next
End If

'Highlight the draged item in its new position
lvwTarget.Selected = True
The nine executable lines of code above (excluding comments) carry out the drag-and-drop operation in a fairly straightforward manner.
-
Target Index Capture
The target row’s index number is saved in the variable intTgtIndex.
-
Removing the Source Item
Since the source row (ListItem) is already stored in the temporary lvwDrag object, the next step is to remove it from its original position:
This ensures the item no longer exists in its original location before being recreated at the new position.
-
Re-creating the Item at the Target Location
The dropped item is reinserted at the target index with its text value preserved from lvwDrag:
(Note: Only the Index and Text parameters are used here. Other options like Key, Icon, and SmallIcon are not included, but if they had been used originally, they would also need to be copied from the lvwDrag object.)
-
Automatic Index Adjustment
When inserting the dragged item into its new position, the ListView control automatically shifts existing items.
-
Example: If the 7th item is dragged and dropped onto the 3rd, the new item is created at index 3.
-
The original item at index 3, and all subsequent items, are automatically pushed forward one position (3→4, 4→5, etc.) to make space for the incoming item.
In short, the drag-and-drop action is achieved by removing the source ListItem and then re-creating it at the target index. At the same time, the control automatically resequences the remaining items.
The Impact of Deleting a Row and Creating it Elsewhere.
Dragging a Row Downwards (Example: Item 3 → Item 7)
When you drag ListItem 3 and drop it on ListItem 7, two automatic index shifts happen:
-
Deletion Phase
-
When Item 3 is deleted, all subsequent items shift up one position.
-
So, items 4,5,6,7,8,9 → become 3,4,5,6,7,8.
-
The original item 7 is now sitting at position 6.
-
Insertion Phase
-
When the dragged item is recreated at index 7, the ListView again adjusts indexes.
-
The current items 7,8 → shift down to 8,9 to make room.
-
Thus, the dragged item now occupies index 7 at the new location.
Visual Effect: It looks like the dragged row (3) has “jumped down” the list, while the original target row (7) has moved up temporarily during deletion, then shifted back down when the new item was inserted.
Dragging a Row Upwards (Example: Item 7 → Item 3)
-
In the reverse scenario (dragging 7 to 3), deleting item 7 shifts items 8,9… up.
-
When the dragged item is inserted at index 3, the existing items 3, 4, 5… are shifted down to accommodate it.
-
Visual Effect: The target row at index 3 appears to “move down” while the dragged row slides into its place.
Key Insight.
The ListView control itself manages this re-sequencing. Your VBA code only needs to:
The rest — shifting items up or down — happens automatically.
Important Note.
-
The term ListItem always refers to the first column (the row header, e.g., Employee ID).
-
The other column values are ListSubItems (children of the ListItem).
-
During drag-and-drop, you’re really moving only the first column (the parent).
-
The associated ListSubItems must be re-attached programmatically in the loop (lvwSub) so the entire row moves as one unit.
This is true if you have not enabled FullRowSelection on the ListView Control Property Sheet on the General Tab.
If column selection is enabled, you can click on any column to start a drag-and-drop action. However, the system always relies on the ListItem Index (the first column) to determine the row reordering sequence. Compare the earlier two images with the third and fourth sample images shown above on this page for a clearer understanding.
For drag-and-drop to work, you must configure the following properties on the ListView Control (Property Sheet → General Tab):
Once these settings are applied:
-
The next five statements in the code transfer all ListSubItems (if any) to the newly created ListItem in the target location.
-
The newly created ListItem is then highlighted to confirm the move.
-
Finally, all temporary object variables are cleared from memory.
Important: This arrangement is only temporary. Any changes are lost when you close the form or reload a new table/query into the ListView control.
If you want the rearranged order to persist (i.e., remain even after reopening), you must update the table with the new order. To support this, we added a new Integer field named ID to the Employees table, which stores the row order.
Below is a sample screen showing the Employee records rearranged in alphabetical order, with their updated indexed order stored in the ID field.
Since the EmployeeID field is an AutoNumber and is linked with several related tables, it cannot be modified or repurposed for row reordering. To handle this, we added a new Number field named ID to the Employees table.
-
The ID field is initialized with values matching the current sequence of EmployeeID numbers.
-
Initially, the ID field values follow the same order as the EmployeeID.
-
However, when you rearrange rows in the ListView Control using the drag-and-drop feature, the visual order of rows changes—even though the underlying EmployeeID remains untouched.
Since the EmployeeID field is an AutoNumber and is linked with several related tables, it cannot be modified or repurposed for row reordering. To handle this, we added a new Number field ID to the Employees table.
-
The ID Field is initialized with values matching the current sequence of EmployeeID numbers.
-
Initially, the ID field values follow the same order as the EmployeeID.
-
However, when you rearrange rows in the ListView Control using the drag-and-drop feature, the visual order of rows changes—even though the underlying EmployeeID remains untouched.
The purpose of this ID field is to store and persist the display order of the records. By updating this field during drag-and-drop operations, we can ensure that the reordered sequence remains intact the next time the form is opened or the data is reloaded.
Look at the EmployeesQ Query SQL given below:
SELECT [FirstName] & " " & [LastName] AS EmployeeName,
Employees.ID,
Employees.EmployeeID,
Employees.TitleOfCourtesy,
Employees.Title,
Employees.Address,
Employees.City,
Employees.Region,
Employees.PostalCode,
Employees.Country,
Employees.HomePhone,
Employees.Extension,
Employees.Notes
FROM Employees
ORDER BY Employees.ID;
The Employees query, used as the data source for the ListView Control, is sorted by the custom ID field. Whenever the rows are rearranged in the ListView through drag-and-drop, the corresponding ID values are updated to reflect the new order.
This updating process is executed in the Form_Unload() event procedure, which runs when the form is closed. By writing the modified index values back to the table at this point, we ensure that the new sequence is preserved.
As a result, the next time the form is opened, the ListView Control will display the records in the same order they were last arranged, rather than resetting to the default EmployeeID sequence.
The Form_Unload() Event Procedure VBA Code.
Private Sub Form_Unload(Cancel As Integer)
Dim lvItem As ListItem
Dim tmp As Long
Dim criteria As String
Dim strfield As String
Dim fld As String

If strTable = "" Then
Set lvwList = Nothing
    Exit Sub
End If

Set db = CurrentDb
Set rst = db.OpenRecordset(strTable, dbOpenDynaset)

For Each lvItem In lvwList.ListItems
    tmp = lvItem.Index
    strfield = lvwList.ColumnHeaders(1).Text 'EmployeeName
    criteria = strfield & " = " & Chr(34) & lvItem.Text & Chr(34)

    rst.FindFirst criteria

    If Not rst.NoMatch Then
       If (rst.Fields(strfield).Value = lvItem.Text) And (rst.Fields(1).Value = tmp) Then
         'GoTo nextitem
       Else
            rst.Edit
            rst.Fields(1).Value = tmp 'replace ID number
            rst.Update
       End If
    Else
        MsgBox "Item: " & tmp & " Not Found!"
    End If
Next
rst.Close

Set lvwList = Nothing
Set lvItem = Nothing
Set rst = Nothing
Set db = Nothing

End Sub
How the Reordered Data is Saved Permanently
In the screenshot, notice that the EmployeeName values are arranged in alphabetical order on the ListView Control. The ID field in the Employees table, however, does not initially follow this sequence.
The goal is to update the ID field so that it reflects the current row order of the ListView Control. Here’s how the procedure works step by step:
-
ListItem Text Value
-
The first column of the ListView row (ListItem.Text) contains the employee’s name.
-
Since the ListItems are arranged alphabetically, their index numbers run from 1 to 9 (in the displayed order).
-
Finding the Corresponding Record
-
For each ListItem, the employee’s name is extracted.
-
A search (rst.FindFirst) is performed in the Employees table/query to locate the matching record.
-
Updating the ID Field
-
When the matching record is found, the ListItem’s current index number is written back into the table’s ID field.
-
This operation is repeated for all ListItems in the control.
-
Handling an Empty ListView
-
At the start of the Form_Unload procedure, we first check whether any source data has been loaded into the ListView (using the strTable variable).
-
If no table/query was selected, the ListView is empty, and the procedure exits without doing anything.
-
Result
-
After processing all records, the form is closed.
-
Next time the form is opened, the ListView is populated from the Employees query, sorted on the ID field.
-
Because the ID values were updated with the last known order, the data will appear in exactly the same sequence as when the form was last closed.
Windows Explorer-like sorting Method.
How Column Sorting Works.
-
When the user clicks a column header, the ListView1_ColumnClick event fires.
-
We detect which column was clicked from the event argument (ColumnHeader.Index).
-
The code then checks whether that column is already the current sort column:
-
Finally, the ListView is refreshed with the new sort order.
Private Sub ListView1_ColumnClick(ByVal ColumnHeader As Object)
' When a ColumnHeader object is clicked, the ListView control is
' sorted by the subitems of that column.

With Me.ListView1
' Set the SortKey to the Index of the ColumnHeader - 1
    .SortKey = ColumnHeader.Index - 1

 If .SortOrder = lvwAscending Then
    .SortOrder = lvwDescending
 Else
    .SortOrder = lvwAscending
 End If
 ' Set Sorted to True to sort the list.
     .Sorted = True
End With
End Sub
Behavior
-
First, click on a column → sorts ascending.
-
Second, click on the same column → sorts descending.
-
Clicking a different column resets to ascending order for that column.
Important Notes on Sorting Behavior.
-
Text-based Sorting Only
-
In the ListView control, every column value—whether it represents numbers, dates, or text—is stored as Text.
-
This is because the ListItems.Add() ListSubItems.Add() Methods use the third parameter (Text) as the displayed value.
-
As a result, all comparisons during sorting are performed as string comparisons.
-
Persistence of Sorted Order (Windows Explorer Behavior)
-
In Windows Explorer, when you sort a folder by name, size, or date, the system remembers your choice.
-
The next time you open the same folder, the list is automatically shown in that last sorted order.
-
Implementing Similar Behavior in Access
-
By using the Form_Unload() event procedure, the ListView’s current sorted order is captured before the form closes.
-
Each ListItem’s index number is saved back into the ID field of the underlying table (Employees).
-
Since, the EmployeesQ Query always sorts on the ID field, the next time the form is opened, the ListView displays the data in the same order that the user last arranged (either by Drag & Drop or Column Sorting).
Demo Database.
- ActiveX ListView Control Tutorial-01.
- ListView Control Tutorial-02.
- Assigning Images To ListView Items.
- ListView Control Drag-Drop Sort Events
- ListView Control With MS-Access TreeView
- TreeView/ListView Controls Drag-Drop Events


 AccessWinAPI.zip