Introduction.
The first blog post that I have written about is the Command Button Animation method in September 2006 on this Web site. I used this animation method in almost all my Projects. The command buttons responding to the mouse moves over them presented a sense of life to the Forms, which otherwise remained rigid and boring. The Command Button and a Rectangle control set with shadow special-effect designed manually.
The Mouse_move() Event Procedures in the form are written manually to call a Function to do the job of animation. I suggest you go through the earlier blog post to get a general idea before continuing. To go to the earlier Article click here.
Now, we will see how to create the Animated Command Button with its animation programs (for each button) on the Form Module, during Form design time with the click of a button.
Animated Button Creation Code.
With two VBA routines, we can do this very easily.
Open one of your databases.
Display the Standard VBA Module.
Create a new Standard Module (Insert - - > Module).
Copy both the following Functions into the Standard Module and save the code:
Command Button Animation Code:
Public Function BAnimate(ByVal strForm As String, ByVal mode As Integer, ByVal lblName As String)
'---------------------------------------------------------------------------
'Author : a.p.r. pillai
'Date   : July 1998
'Remarks: Animates the Command Button
'Rights : All Rights Reserved by www.msaccesstips.com
'---------------------------------------------------------------------------
Dim Frm As Form, l As Long, t As Long

On Error GoTo BAnimate_Err

Set Frm = Forms(strForm)

l = Frm.Controls(lblName & "Box").Left
t = Frm.Controls(lblName & "Box").Top

If (mode = 1) And (Frm.Controls(lblName & "Box").Visible = False) Then
    Frm.Controls(lblName & "Box").Visible = True
        Frm.Controls(lblName).Left = l - (0.0208 * 1440)
        Frm.Controls(lblName).Top = t - (0.0208 * 1440)
        Frm.Controls(lblName).FontWeight = 700
ElseIf (mode = 0) And (Frm.Controls(lblName & "Box").Visible = True) Then
    Frm.Controls(lblName & "Box").Visible = False
        Frm.Controls(lblName).Left = l
        Frm.Controls(lblName).Top = t
        Frm.Controls(lblName).FontWeight = 400
End If

BAnimate_Exit:
Exit Function

BAnimate_Err:
Err.Clear
Resume BAnimate_Exit

End Function
Animated Command Button Creation Code:
Public Function CreateButton(ByVal intSection As Integer, strName As String)
'---------------------------------------------------------------------------
'Author : a.p.r. pillai
'Date   : Aug. 2000
'Remarks: Creates animated command button controls and Programs on a Form
'       : at design time of the form.
'Rights : All Rights Reserved by www.msaccesstips.com
'---------------------------------------------------------------------------
'Program Parameter Values : intSection
'     0 =  Form Detail Section
'     1 =  Form Header Section
'     2 =  Form Footer Section
'                         : strName
'Command Button Name Property Value
'The Name will be prefixed with the text 'cmd'
'Example: Edit will be modified as cmdEdit
'Sample Run : CreateButton 0,"Edit"
'Remarks    : If more than one Form is opened in Design View then the
'           : Command Button will be created on the first Form
'---------------------------------------------------------------------------
Dim Frm As Form, Ctrl As Control, txt As String
Dim vLeft As Long, vTop As Long, vWidth As Long, vHeight As Long
Dim i As Long, dif As Double, x As Long, Y As Long, z
Dim frmViewStatus As Integer, frmsCount As Integer, j As Integer
Dim hfd As String
On Error Resume Next

i = 1440
dif = 0.0208 * i
vLeft = 0.25 * i
vTop = 0.0521 * i
vWidth = 1.25 * i
vHeight = 0.2375 * i

frmsCount = Forms.Count - 1
frmViewStatus = False
For j = 0 To frmsCount
    If Forms(j).CurrentView = 0 Then
      Set Frm = Forms(j)
      frmViewStatus = True
      Exit For
    End If
Next
If frmViewStatus = False Then
   MsgBox "Open a Form in Design View then try again." & vbCr & vbCr & "Program CreateButton() Aborted."
   Exit Function
End If

  Set Ctrl = CreateControl(Frm.Name, acRectangle, intSection, , , vLeft, vTop, (vWidth - dif), (vHeight - dif))

  With Ctrl
    .Name = "cmd" & strName & "Box"
    .SpecialEffect = 4
    .BorderWidth = 3
  End With

  Set Ctrl = CreateControl(Frm.Name, acCommandButton, intSection, , strName, vLeft, vTop, vWidth, vHeight)

  With Ctrl
    .Name = "cmd" & strName
    .Caption = strName
  End With

  x = Frm.Module.CreateEventProc("MouseMove", Ctrl.Name)

  txt = "BAnimate me.name, 1, " & Chr(34) & "cmd" & strName & Chr(34)
  Frm.Module.InsertLines x + 1, txt

  hfd = Choose(intSection + 1, "Detail", "FormHeader", "FormFooter")

  z = Frm.Module.ProcBodyLine(hfd & "_MouseMove", vbext_pk_Proc)

  If z = 0 Then
      x = Frm.Module.CreateEventProc("MouseMove", hfd)
  Else
      x = z + 1
  End If

  txt = "BAnimate me.name, 0, " & Chr(34) & "cmd" & strName & Chr(34)
  Frm.Module.InsertLines x + 1, txt


CreateButton_Exit:
Exit Function

CreateButton_Err:
Resume CreateButton_Exit
End Function
Press Ctrl+S to save the programs. Keep the VBA Window open.
Do the Test Run.
Now that you have the main functions for creating and animating Command Buttons, let us do a quick run to see how easy it is.
Close all open forms, if any.
Open a new Form in Design View.
Display the VBA window, if it was closed or minimized (Alt+F11).
Display the Debug Window (Immediate Window) - Ctrl+G.
Type the following statement in the Debug Window and press Enter Key:
CreateButton 0,"Edit" The first Parameter value 0, represents the Form's Detail Section (0=Detail, 1=Form Header, 2=Form Footer), where we want the Command Button to appear.
The second parameter “Edit” is the Command Button's Name (will be modified as cmdEdit and set in the Name property) and Caption value. The second parameter must be always a single word. This is absolutely necessary to create the MouseMove Event Procedure correctly on the Form's Module. The Caption of the Command Button can be changed later, if necessary.
Minimize the VBA window to show the Form in Design View. You can see the Command Button is created in the Detail Section of the Form with the Caption Edit.
Change the Form into Form View.
Move the Mouse over the Command Button. The button moves up a little and to the left to show a shadow at the bottom and to the right of the Command Button.
Move the mouse out of the button. The Command Button settles back to the original position hiding the shadow.
Repeat this action in quick succession. You can see the movement of the button more clearly.
The VBA Code is Written by the Program.
If you display the Form's VBA Module you can see that the following VBA Program lines are written into it:
Private Sub cmdEdit_MouseMove(Button As Integer, Shift As Integer, X As Single, Y As Single)
     BAnimate Me.Name, 1, "cmdEdit"

End Sub

Private Sub Detail_MouseMove(Button As Integer, Shift As Integer, X As Single, Y As Single)
    BAnimate Me.Name, 0, "cmdEdit"

End Sub
Change the Form mode to Design View again.
Click on the Command Button to select it.
Drag the Command Button to the right and down to show the Rectangle Control with the special effect shadow underneath it.
The Command Button and the Rectangle Control together make the animation trick. Click somewhere near the Command Button and drag the Mouse over it to select them together and drag them to the intended location. Do this before you attempt to create another Command Button in the same section of the Form, otherwise, the next one will be created and placed over the earlier one. New Command Buttons are always created in the same location in the Form Section.
Right-Click on the Detail Section of the Form and select Form Header/Footer to display them on the Form.
Creating Button on Header or Footer Section.
Now, you may try the CreateButton() Function with the first parameter value 1 or 2 to create Command Buttons in the Form Header or Form Footer Sections respectively. The Second parameter, the Name of the Command Button must be different for all Command Buttons on the same Form. Sample statements for creating Animated Command Buttons on the Header and Footer of the Form are given below:
CreateButton 1, "PrintPreview"
CreateButton 2, "Exit"
NB: Keep the Header/Footer Sections visible before you attempt to create Command Buttons on them. There should not be more than one form in Design View. Otherwise, the first form found in the design mode will be selected for creating the button controls.
During the design time of the form running the CreateButton() Function from the Debug Window is the most convenient method. But, if you look for something different like launching the program from a Command Button Click then we can do that too.
Button Creation from a Command Button Click.
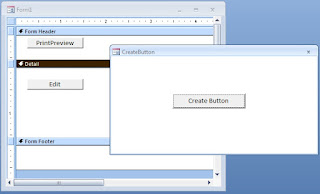
We can create a Command Button on a Form to click and input parameter values for the button creation program and quickly create it on the Form currently in Design View and build its Sub-Routines on the Form Module as well.

Open a new Form in Design View.
Create a Command Button as you do normally.
Display its Property Sheet when the Command Button is in the selected state (F4).
Change the Name property value to cmdCreate and set the Caption property value to Create Button.
Display the Form's VBA Module (Alt+F11).
Copy and Paste the following Code into the Module and press Ctrl+S to save the Form with the name frmCreateButton:
Private Sub cmdCreate_Click()
Dim intSection As Integer, strButtonName As String
Dim msg As String
msg = "Form Section (0,1 or 2)" & vbCr
msg = msg & "0 - Form Details" & vbCr
msg = msg & "1 - Form Header" & vbCr
msg = msg & "2 - Form Footer"

intSection = 3
Do While intSection < 0 Or intSection > 2
    intSection = Nz(InputBox(msg, "cmdCreate_Click()"), 0)
Loop

strButtonName = ""
Do While Len(strButtonName) = 0
    strButtonName = InputBox("Command Button Name", "cmdCreate_Click()")
Loop

   If (intSection >= 0 And intSection < 3) And Len(strButtonName) > 0 Then
       CreateButton intSection, strButtonName
   End If

End Sub
Perform a Demo Run
Open a form in Design View and display the Form’s Header/Footer Sections.
Open the frmCreateButton in Normal View.
Click on the Command Button to enter the parameter values of the program.
Input one of the values (0, 1, or 2) suggested by the Prompt to select a Section of the Form and press the Enter Key or Click OK button.
Enter a Name for the Command Button in the second prompt (it should be a single word like PrintPreview) and press Enter Key or Click OK.
The Command Button controls are created on the selected Section of the form you kept open in the design view.
If you want to use this method on all your Projects then you may transfer the first two Functions (BAnimate() and CreateButton()) Codes into a common Library Database and attach them as Reference Library File (refer to the Blog Post Command Button Animation to know how to do this) to your Projects.
- Command Button Animation
- Double Action Command Button
- Colorful Command Buttons
- Transparent Command Button
- Command Button Animation-2
- Creating Animated Command Button with VBA
- Command Button Color Change on Mouse Move


