Microsoft Access VBA Tutorials for self-paced learning, Class Modules, SQL Techniques, and AI Integration Guides.

Synchronized Floating popup Form

Synchronized Floating Popup Form.

This form is designed specifically for inquiry purposes (not for data entry). The Source Data Table has several fields, and the information in them can be categorized into different groups for viewing.

For example, the Employees Form in the Northwind.mdb sample database is divided into two sections: Company Information and Personal Information. The Company Information fields are placed on the first page of a Tab Control, and the Personal Information fields are located on the second page, which remains hidden until the user clicks its tab to bring that data into view. Typically, since the Company Information section is accessed or updated more frequently, it is kept in full view, and the Personal Information section stays tucked away in the background, as it is not always viewed or edited.

We will design the application differently by using two separate stand-alone Forms without linking them as a Main Form and a Subform. One Form will display Company Information, while the other will display Personal Information. Both Forms will use the Employees table as their record source.

Why use two Forms? Whenever the personal information for one or more employees needs to be viewed, simply open the Personal Information Form while keeping both Forms synchronized. This allows the company and personal information for the same employee or employees to be viewed simultaneously.

Let us name them as EmployeeMain and EmployeeSub Forms. They will remain as two independent Forms. A sample image of both Forms in running mode is given below:


The Trick Designs Plan

The trick is that when we open the EmployeeMain Form, it will show only the Company Info alone (no trick here). We will move a few records forward using the Record Navigation Button, and at this point, we would like to see the Personal Info part of the current record. We will click on a Command Button to open the EmployeeSub Form with the Personal Info of the current record on the EmployeeMain Form. From this point onwards, the records on both Forms move forward or back, and both ways are synchronized when moving to the Next or Previous records on the EmployeeMain Form, even though they are two separate Forms.

The EmployeeSub Form is defined as a Pop-up Form (or its Pop-up Property value is set to Yes) to float it above the EmployeeMain Form or any other Form open in the Application Window, provided you don't open another Pop-up Form. If you don't want the EmployeeSub Form, then close it and open it again when needed using the Personal Info Command Button on the EmployeeMain Form. When you close the EmployeeMain Form, this will close the EmployeeSub Form if it is running.

  1. We can very easily design these two Forms by importing the Employees Table and Employees Form from the C:\Program Files\Microsoft Office\Office11\Samples\Northwind.mdb Database. If you have not used these forms for any other examples given on this site, you may import them into your database now.

  2. Open the Employees Form in Design View.

  3. Click the Form and drag the mouse over all Controls on the Company Info Tab except the Photo (if you want it, you may select that too) and the Command Button controls.

  4. Select Copy from the Edit Menu.

  5. Click on the Employees Table, select Form from the Insert menu, and select Design-View from the list of options displayed to create a new Form.

  6. Click on the Detail Section of the Form and select Paste from the Edit Menu to place the copied fields of the Employees Form onto the new Form.

  7. If the Form Header/Footer Sections of the Form are not visible, then select Form Header/Footer from the View Menu.

  8. Copy and paste the Text Control with the employee name expression from the Header Section of the Employees Form into the Header Section of your Form. Change the Font Color to Red or some other color you like.

  9. Create a Command Button in the Detail Section below the data fields.

  10. Display its Property Sheet (View -> Properties).

  11. Change the Name Property Value to cmdPersonalInfo and the Caption Property Value to Personal Info.

    NB: You must be careful with the names of Forms and Controls I suggest here because they are used in the Programs. If you give them differently, the trick may not work as expected after completion.

  12. Create a Command Button at the Footer Section of the Form.

  13. Change the Name Property value to cmdClose and the Caption Property Value to Close.

  14. Display the Form's Property Sheet. Click on the left top corner of the Form where a black rectangle is shown, at the intersection of the horizontal and vertical design guides (scales), to select the Form's Property Sheet, if it is not the current one.

  15. Change the Caption Property Value to Company Info.

  16. Display the VBA Code Module of the Form (Alt+F11). Copy and paste the following code into the Code Module.

    The Form Module Code.

    Option Compare Database
    Option Explicit
    Dim strSQL As String
    
    Private Sub cmdClose_Click()
       DoCmd.Close
    End Sub
    
    Private Sub cmdPersonalInfo_Click()
    If IsLoaded("EmployeesSub") Then
       strSQL = "SELECT Employees.* FROM Employees "
       strSQL = strSQL & "WHERE ([EmployeeID] = " & Me![EmployeeID] & ");"
       Forms("EmployeeSub").RecordSource = strSQL
       DoCmd.SelectObject acForm, "EmployeeSub", False
    Else
       DoCmd.OpenForm "EmployeeSub", acNormal, , "[Employeeid] = " & Me![EmployeeID], acFormReadOnly, acWindowNormal
    End If
    
    Forms("EmployeeMain").ActiveControl.SetFocus
    
    End Sub
    
    Private Sub Form_Close()
        DoCmd.Close acForm, "EmployeeSub"
    End Sub
    
    Private Sub Form_Current()
    If IsLoaded("EmployeeSub") Then
       strSQL = "SELECT Employees.* FROM Employees "
       strSQL = strSQL & "WHERE ([EmployeeID] = " & Me![EmployeeID] & ");"
       Forms("EmployeeSub").RecordSource = strSQL
       DoCmd.SelectObject acForm, "EmployeeSub", False
       Forms("EmployeeMain").SetFocus
    End If
    
    End Sub
    
    Private Sub Form_Open(Cancel As Integer)
    DoCmd.Restore
    End Sub
    
  17. Save the Form named EmployeeMain.

  18. Repeat the process from Step 3 to Step 8 for transferring information from the Personal Info Tab of the Employees Form to a new Form.

  19. Display the Form Header/Footer Section of the Form (View ->Form Header/Footer).

  20. Create a Command Button and change the Name Property Value to cmdClose and the Caption Property Value to Close.

  21. Display the Form's Property Sheet.

  22. Change the following Property Values as given below:

    • Caption = Personal Info
    • Default View = Single Form
    • Allow Additions = No
    • Allow Deletions = No
    • Data Entry = No
    • Record Selectors = No
    • Navigation Buttons = No
    • Dividing Lines = No
    • Auto Resize = Yes
    • Pop Up = Yes
    • Border Style = Dialog
    • Allow Design Changes = Design View Only.
  23. Display the Code Module of the Form (Alt+F11).

  24. Copy and paste the following code into the Code Module.

    Private Sub cmdClose_Click()
            DoCmd.Close acForm, Me.Name
    End Sub
    
  25. Save the Form with the name EmployeeSub.

    We need a small program to check whether the EmployeeSub Form is in an Open state or not before attempting to refresh its source data and bring it into a visible state.

    The Standard Module Code.

  26. Copy and Paste the following Code into a Global Module (Standard Module) and save the Module:

Public Function IsLoaded(ByVal strFormName As String) As Boolean
Dim j As Integer

On Error GoTo IsLoaded_Err

IsLoaded = False
For j = 0 To Forms.Count - 1
    If Forms(j).Name = strFormName Then
       IsLoaded = True
       Exit For
    End If
Next

IsLoaded_Exit:
Exit Function

IsLoaded_Err:
IsLoaded = False
Resume IsLoaded_Exit
End Function

The Demo Run

  1. To try out your creation, open the EmployeeMain Form and click on the Record Navigation Control to advance a few records forward.

  2. Click on the Personal Info Command Button. The EmployeeSub Form will open, displaying the Personal Information that belongs to the same employee on the main Form. Check the Name of the Employee appearing on top of both forms.

  3. Now, try advancing records on the main form forward or back to the record navigation control. You will see that the corresponding personal information on the EmployeeSub Form also belongs to the same record on the main form.

  4. If you close the EmployeeMain Form while the EmployeeSub Form is open, both will be closed.

Download Demo Database.

You may download the sample database from the Download Link given below and give it a try before you design one of your own to understand the trick:


Share:

Forms and Custom Properties

Forms and Custom Properties.

Searching for and locating a record in a Form is quite easy using the Edit → Find (Ctrl + F) option on a specific field value. However, this method retrieves only the first matching record, even when multiple records share the same search text. In practice, we often need to filter records that match criteria across fields, for example, finding all Sales Representatives of Northwind Traders who are located in the City of London.

Let’s create a simple method to find and display all records from the Employees table that match both the City and Title fields.

If you haven’t already done so, import the Employees sample table from:
C:\Program Files\Microsoft Office\Office\Samples\Northwind.mdb.

  1. Next, create a temporary table named temp_param with two text fields: City and Title.

  2. Add a single record with the following values:

    • City: London

    • Title: Sales Representative

  3. Now, design the Main Form using this table as its Record Source and place both fields in the Form Header Section.

  4. For a better, user-friendly approach, create two ComboBoxes, rather than placing the fields on the Form. Populate both ComboBoxes using distinct values from the City and Title fields of the Employees table. To do this, create two Select Queries that group these field values, and then use them as the Row Source for the Combo Boxes. Follow the steps outlined below.

  5. Query Name: cboCityQ

    SELECT Employees.City
    FROM Employees
    GROUP BY Employees.City;
    

    Copy and paste the above SQL String into a new Query's SQL editing window and save it with the name cboCityQ. Create a second Query with the SQL string given below and save the Query with the name cboTitleQ.

  6. Query Name: cboTitleQ
    SELECT Employees.Title
    FROM Employees
    GROUP BY Employees.Title;
    
  7. Create a Combo-Box in the Header Section of the Main Form using cboCityQ as source data and select City as Control Source.

  8. Create another Combo-Box, use the cboTitleQ Query as source data, and select Title as Control Source.

  9. Name the City field ComboBox as cboCity, and the Title field ComboBox as cboTitle.

  10. Design a Datasheet form on the Employees Table and save the Form with the name Employees_Sub.

  11. Insert the Employees_Sub Form as a Sub-Form in the Detail Section of the Main Form.

  12. Click on the Sub-Form, display the Property Sheet (View -> Properties), and set the following Property values as shown below:

    Link Child Fields = City; Title

    Link Master Fields = cboCity;cboTitle

  13. Now you can select the City and Title values from the combo boxes, and all the matching records will immediately show up in the Datasheet Sub-Form.

Database Sharing Issues.

If the database is used by a single user (or opened with exclusive access by one user on the network), the above method will work perfectly without any issues. However, the situation changes when the database is shared among multiple users on a network.

Even though each user opens a separate instance of the Main Form on their own machine, they are all sharing the same underlying table to set their search criteria at the same time. This shared access can lead to conflicts, because when one user refreshes the Main Form and updates the record in the temp_param table, it can overwrite or interfere with another user’s search parameters.

As a result, both users may end up with unexpected or incorrect results when the form is refreshed, and the shared parameter table is modified by another user.

A Workaround Method

A workaround to this problem is to use Unbound Text Boxes/Combo-Boxes on the Main Form and not to use the temp_param Table at all to store the values selected from cboCity and cboTitle Combo-Boxes.

Users can set the Values on the Unbound Text Box/combo box on their own instance of the Form without conflicts.

This method also has some, not-so-serious, side effects. When the User opens the Main Form, it will be empty till they select some values from the unbound combo boxes. We can rectify this to a certain extent by creating two Custom Properties on the Main Form. Save the last used value from the combo box controls into these custom properties when the Form closes, and restore them when the Form opens again.

Why, I said to a certain extent, because if several Users are sharing the Main Form, then the Custom Property values are saved by each User in the Main Form (when he/she closes their instance of the Form) and will retain only the value saved last. But all the users who open the Main Form next time will be presented with the records related to the Custom Property Values saved last. But this is not a big issue because when they open the Form next time, they may require records for different criteria and can change them too.

Creating Custom Properties on Form.

To implement this method, first, we must create the Custom Properties: prpCity and prpTitle on the Main Form and save some initial values into them. We can do this only with VBA Code. The Sample Code is given below:

Public Function CustomProperty()
Dim db As DAO.Database, doc As Document, prp As Property

Set db = CurrentDb
Set doc = db.Containers("Forms").Documents("Main")
'creates the Custom Property with Name, data type and initial value
Set prp = doc.CreateProperty("prpCity", dbText, "London")

'add the new Custom Property to the Properties collection of the Form Main
'NB: This will not appear in the Property Sheet of the Form

doc.Properties.Append prp
Set prp = doc.CreateProperty("prpTitle", dbText, "Manager")
doc.Properties.Append prp
doc.Properties.Refresh
End Function

Here, you can see that the reference to the Main Form is addressed differently than the usual method of Forms_Main or Forms![Main] or Forms("Main"), etc. The Forms group is addressed as Container; a member of the Containers (Tables, Forms, Reports, etc.) The group and the Main Form are addressed as a Document, a member of the Documents Collection. To learn more about Containers and Documents, visit the page with the Title: Saving Data on Forms not in a Table.

Since this is a one-time exercise, you can copy the above Code into a Global Module (Standard Module) and run the Code directly by placing the cursor in the middle of the Code and pressing F5 (Run).

If you attempt to run the Code a second time, it will show Errors indicating that the Custom Properties with the given name are already present in the Form.

The next step is to use these Custom Properties within the Form_Close() and Form_Load() event procedures. In the Form_Close() event, we will save the current values from the Combo Box controls in the Form’s Custom Properties. Then, in the Form_Load() event, these saved values will be restored automatically in the corresponding Combo Box controls when the Form is opened again.

This ensures that the user’s last-selected filter criteria are remembered and re-applied the next time the Form is opened, providing a smoother and more user-friendly experience.

Saving Combo Box Value into Custom Property.

The following Code saves the combo box contents into prpCity and prpTitle custom properties on the Main Form when the Form is closed:

Private Sub Form_Close()
Dim db As Database, doc As Document, prp As Property

On Error GoTo Form_Close_Err

Set db = CurrentDb
Set doc = db.Containers("Forms").Documents("Main")

'Save the current values from the combo boxes into the custom properties
doc.Properties("prpCity").Value = Me![cboCity]
doc.Properties("prpTitle").Value = Me![cboTitle]

Form_Close_Exit:
Exit Sub

Form_Close_Err:
MsgBox Err.Description, , "Form_Close()"
Resume Form_Close_Exit
End Sub

Restoring Value from Custom Property.

The following Code restores the cboCity and cboTitle values when the Main Form opens for Users again:

Private Sub Form_Load()
Dim db As Database, doc As Document, prp As Property

On Error GoTo Form_Load_Err

Set db = CurrentDb
Set doc = db.Containers("Forms").Documents("Main")

'Set the Combobox values from the Custom Property values saved earlier

Me![cboCity] = doc.Properties("prpCity").Value
Me![cboTitle] = doc.Properties("prpTitle").Value

Form_Load_Exit:
Exit Sub

Form_Load_Err:
MsgBox Err.Description, , "Form_Load()"
Resume Form_Load_Exit
End Sub

How about positioning a particular record on the Form that you worked on last time, as the current record when the Form opens? Click here to find out.

Share:

ControlTip Text and Time Delay

ControlTip Text and Time Delay.

Most of the controls on a Form—such as Command Buttons, Labels, Text Boxes, and others—have a ControlTip Text property. This property can hold text up to a maximum length of 255 characters, which can be set either manually during design time or programmatically through VBA.

The text entered here is displayed when the mouse pointer hovers over the control for a few seconds. This is particularly useful for providing quick hints or instructions to the user, such as prompting them to click or double-click a Control to execute a program or macro attached to it.

Similarly, Toolbar Buttons in Access also feature this capability through their ScreenTip property (which functions the same way as ControlTip Text). These small pop-up hints guide users by explaining what each button does or by suggesting keyboard shortcuts.

For example, when you point to the Copy toolbar button, the tooltip displays “Copy (Ctrl+C)”, indicating that you can either click the button or press Ctrl+C to copy the selected text or control.

This brief delay before the tooltip appears is intentional—it assumes that if the user leaves the mouse resting on a control, they may be uncertain about its function. The tooltip then provides helpful information about the control’s purpose or action, improving the overall user experience.

Our own Method without Time Delay.

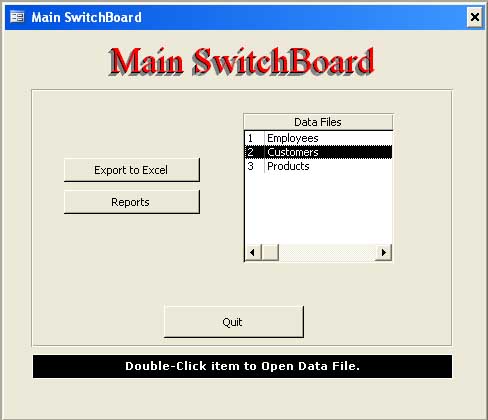
Here, we will implement a new method for the controls on the Main Switchboard (Control Screen)—such as Command Buttons and List Boxes—to provide immediate feedback to the user without the time delay inherent in the ControlTip Text property.

There is another property, called Tag, located near the ControlTip property in the control’s property sheet. Its function is not predefined and is completely free for custom use. The value stored in the Tag property does not affect the control’s behavior or interact with other properties in any way. In fact, you can store up to 2048 characters of text here—enough to write a short description or even a mini story!

We will use this Tag property creatively on the controls of the Main Switchboard in a sample database. The idea is to instantly display helpful hints or action clues to the user—for example, what each control does or what kind of action (click or double-click) should be performed to run a program or macro associated with that control.

To implement this, open the Property Sheet (via View → Properties) for each control on the Switchboard, and type your desired descriptive text into the Tag property. Then, place a Label control at the bottom of the form (give it a dark background or any color you prefer) to serve as the “instant help bar.”

When the mouse pointer moves over a control with a Tag value set and programmed, the Tag’s text value appears immediately in that label—without any delay—offering the user quick, context-sensitive information.

An image of a sample Main Switch Board with the above trick is given below:


Using the Mouse Move Event

A Label with a dark background (let us call it LBLTIP) is placed at the bottom of the design to display the clues when the Mouse moves over the controls above. The example text shown in the image was saved in the Tag Property of the ListBox along with the Forms' Names.

To display the clue and to remove it when the Mouse moves out of the Control, we need to run a few lines of VBA Code at two places. The On Mouse Move Event Procedure of the Control, as well as in the Detail Section of the Form, to remove the text and replace it with some general message text or a zero-length string to keep it empty.

The sample code in the On Mouse Move Event Procedure of the Reports Command Button is given below. It displays Open Report SwitchBoard in the LBLTIP label Caption text at the bottom of the form when the Mouse is moved over the Command Button.

Private Sub cmdRpt_MouseMove(Button As Integer, Shift As Integer, X As Single, Y As Single)
If Me.LBLTIP.Caption = Me.cmdRpt.Tag Then
    Me.LBLTIP.Caption = Me.cmdRpt.Tag
End If
End Sub

When the Mouse moves out of the Command Button and touches the empty area of the Detail Section of the Form, the LBLTIP Caption changes to Welcome User: Admin (the current MS-Access User Account name) and stays there till the mouse moves over to another Control on the Form.

The VBA Code in the Detail Section, On Mouse Move Event Procedure is given below:

Private Sub Detail_MouseMove(Button As Integer, Shift As Integer, X As Single, Y As Single)

Dim strtag As String

strtag = "Welcom User: " & CurrentUser

If Me.LBLTIP.Caption <> strtag Then
    Me.LBLTIP.Caption = strtag
End If

End Sub

Limiting the Mouse Move Event

Even though the Detail Section Mouse Move Event Procedure has no change in the Code, repeating all three lines of code for each control is excessive work. The IF... Then the Statement is used to test and prevent setting the LBLTIP Caption value every time.

We can implement this feature with just a single line of code if we define a common routine and place it in a Global Module (Standard Module). Once the routine is in place, it can be called from any control’s event procedure with the necessary parameters, keeping your codebase clean and reusable.

A sample function to achieve this is shown below:

Copy the following VBA Code and save it in a Standard Module:

Public Function ControlTip(ByVal frmName As String, Optional strtext As String = "Welcome User: ", Optional xswitch As Integer = 0)
On Error GoTo ControlTip_Err
With Forms(frmName).Controls("lblTip"
    Select Case xswitch
        Case 1
            If .Caption <> strtext Then
                .Caption = strtext
            End If
        Case Else
            If .Caption <> strtext Then
                .Caption = strtext & CurrentUser
            End If
    End Select
End With

ControlTip_Exit:
Exit Function

ControlTip_Err:
MsgBox Err.Description, , "ControlTip()"
Resume ControlTip_Exit
End Function

The above Function has three Parameters:

  1. Name of the Form where the Function is called.

  2. The LBLTIP.Caption display text. This will be taken from the Tag Property Value of the Control. This parameter is defined as Optional so that this can be called without a value at the Form level (in our example from the Detail Section) to display the welcome message after removing the earlier contents.

  3. The Optional xswitch parameter value is used for display choices. The Value of 1 will display the Text value passed through the Second Parameter, or else it will display a welcome message to the User, replacing the earlier text in the LBLTIP Caption Property.

With the above Function, we can simplify the first two Sub-Routines as given below:

Private Sub cmdRpt_MouseMove(Button As Integer, Shift As Integer, X As Single, Y As Single) 

ControlTip Me.Name, Me.cmdRpt.Tag, 1

End Sub

Private Sub Detail_MouseMove(Button As Integer, Shift As Integer, X As Single, Y As Single)

    ControlTip Me.Name
    
End Sub

 Demo Database Download.

You can download the sample database (Access 2000 Version) from the link given below and try it out.


Download Demo ControlTip2k.zip

Share:

External Files List in Hyperlinks

External Files List in Hyperlinks.

    We have seen that we can open and work with external data sources, dBase Tables, Excel Databases, and AS400 (iSeries) tables directly without linking them permanently to MS Access, as demonstrated in earlier articles.

    In this tutorial, we will explore a different kind of external access — working with files on your disk, regardless of their type (Word documents, Excel workbooks, PDFs, images, etc.), and displaying them as clickable hyperlinks in an Access Form that opens in their respective default applications.

    To achieve this, we will:

    1. Browse and select files from Disk using the Common Dialog Control (the File Browser).

    2. Store the file paths in a Table for easy retrieval.

    3. Display the list of files as hyperlinks on a Form.

    4. Open each file in its associated program (Word, Excel, Adobe Reader, etc.) simply by clicking the hyperlink.

    This approach is useful in scenarios such as:

    • Managing project-related documents from within Access.

    • Providing quick access to scanned images or PDFs attached to records.

    • Creating document libraries, training materials, or archives where Access acts as a front-end to organize and launch files efficiently.

    Before diving into the implementation, let us first understand how the Common Dialog Control (File Picker) works and how we can use it to browse and select files dynamically.

  • Opening External Data Sources
  • Opening dBase Files Directly
  • Display Excel Value Directly on Form
  • Opening an Excel Database Directly
  • Database Connection String Properties
  • Access Live Data in Excel
  • Access Live Data in Excel-2
  • Source ConnectStr Property and ODBC
  • But all of them fall into only one category: data files.

    Designing the Files List Form.

    To answer the above queries, we will create a Form with a Datasheet Sub-Form and with a few simple controls to take a listing of all frequently used files of your choice (Text Files, Word Files, Excel Files, or  Files of all Types) from the Disk and display them in a list of Hyperlinks. When you like to open and work with a file in its parent Application, simply click on the hyperlink to select and open the file.  An Image of the sample Form is given below:

    Finding Files in Folders

    Click the Create File Links button to open the File Browser (the Common Dialog Control). Browse to locate your desired files; you may select one or more, and click OK to bring their references into the List Control as clickable Hyperlinks.

    The File Path Name for each file is displayed in the next control to the right of the hyperlink. This makes it easy to identify the location of frequently used files such as Excel workbooks, Word documents, PDFs, or any other file type you’ve linked.

    This entire process takes only a few mouse clicks, something you’re likely to do many times throughout the day. You can also import files in batches, and each selection will be added automatically to the directory-list table, building your library of linked documents.

    The Data Sheet Form Design.

    The Form has a simple design, as shown in the image above. The following are the main elements of the design.

    1. A Table: DirectoryList with two Fields: 1. FileLinks with data type Hyperlink. 2. Path with a Text data type to store the file’s complete path name.

    2. The Datasheet Form was created in the Table named FilesListing_Sub.

    3. The Main Form Files Listing with the Datasheet Form inserted as a Sub-Form that occupies the major part of the design.

    4. A Command Button (Name: cmdFileDialog) with the Caption Create File Links runs the Common Dialog Control to browse and select files from the Disk and insert them as Hyperlinks in the FileLinks Field of the Table.

    5. The Field Path will be updated with the location address of the selected files.

    6. The Unbound Text Box below will show the Current Project Path as the default location when the File Dialog is open.

    7. The Command Button named cmdDelAll, and the Caption Delete All Links,  clicks to delete all file links from the tables.

    8. The Command Button with the name cmdDelLink and the Caption Delete One Link clicks to delete the selected hyperlink item from the List.  You can manually delete one or more Links, select them by holding the Shift key down and clicking on the left border of items next to each other, and press the DELETE Key.

    9. Command Button with the Caption Delete File on Disk and the name cmdDelFile deletes the selected Link, followed by physically deleting the file on disk.  So be careful with this option. Only one File can be deleted at a time.  Use this option with caution; once the file is deleted from the disk, it cannot be reversed.  Click on the left border of a link to select it, and click on Delete File on Disk.

Managing the Files List

The Files List is created as Hyperlinks in the target table named DirectoryList. Each record in this table consists of the file’s display name and its corresponding full path stored as a valid hyperlink reference.

New links can be added to the list at any time, and the incoming links are automatically appended to the existing records without overwriting previous entries. Manual data entry or direct editing of hyperlinks through the Form is not allowed, ensuring that the hyperlink structure remains intact.

If you wish to make experimental changes, open the DirectoryList table directly in Datasheet View and modify it there. However, this is not recommended, since any accidental changes to the Hyperlink Value Segments (the visible text, the actual address, or the optional sub-address) may break the link or cause it to open incorrectly.

If you would like to know more about the Hyperlink Value Segments (four segments) and what they do, go to the link Open Forms with Hyperlinks in ListBox.

Download the sample database from the bottom of this page and try it out before you design one of your own to understand how it works.

You can easily implement this in your various Projects by simply importing the Forms and the Table into your Projects if required. The demo database is an Access 2007 Version file.

The Main Form Class Module Code

The VBA Code, which runs behind the Main Form Files Listing, is listed below for info.

Option Compare Database
Option Explicit
Dim strpath As String

Private Sub cmdClose_Click()
DoCmd.Close acForm, Me.Name
End Sub

Private Sub cmdDelFile_Click()
On Error GoTo cmdDelFile_Click_Err
Dim db As DAO.Database, rst As DAO.Recordset
Dim strFile As String

strFile = Me.DirectoryList.Form!Path
Set db = CurrentDb
Set rst = db.OpenRecordset("DirectoryList", dbOpenDynaset)
rst.FindFirst "Path = '" & strFile & "'"
If Not rst.NoMatch Then
If MsgBox("File: " & strFile & vbCr & "DELETE from Disk?", _
vbQuestion + vbYesNo, "cmdDelFile_Click") = vbYes Then
   If MsgBox("Are you sure you want to Delete" & vbCr _
   & rst!Path & " File from DISK?", vbCritical + vbYesNo, "cmdDelFile_Click()") = vbNo Then
    GoTo cmdDelFile_Click_Exit
   End If
    rst.Delete
    rst.Requery
    Me.DirectoryList.Form.Requery
    If Len(Dir(strFile)) > 0 Then
    Kill strFile
    MsgBox "File: " & strFile & " Deleted."
    Else
      MsgBox "File: " & strFile & vbCr & "Not Found on Disk!"
    End If
End If
Else
    MsgBox "File: " & strFile & " Not Found!!"
End If

cmdDelFile_Click_Exit:
rst.Close
Set rst = Nothing
Set db = Nothing
Exit Sub

cmdDelFile_Click_Err:
MsgBox Err & " : " & Err.Description, , "cmdDelFile_Click()"
Resume cmdDelFile_Click_Exit
End Sub

Private Sub cmdHelp_Click()
DoCmd.OpenForm "Help", acNormal
End Sub

Private Sub Form_Load()
'strpath = CurrentProject.Path & "\*.*"
On Error GoTo Form_Load_Err
GetProperty
strpath = Me!PathName

Form_Load_Exit:
Exit Sub

Form_Load_Err:
MsgBox Err & " : " & Err.Description, , "Form_Load()"
Resume Form_Load_Exit
End Sub

Private Sub cmdDelLink_Click()
On Error GoTo cmdDelLink_Click_Err
Dim db As DAO.Database, rst As DAO.Recordset
Dim strFile As String

strFile = Me.DirectoryList.Form!Path
Set db = CurrentDb
Set rst = db.OpenRecordset("DirectoryList", dbOpenDynaset)
rst.FindFirst "Path = '" & strFile & "'"
If Not rst.NoMatch Then
If MsgBox("Link: " & strFile & vbCr & "DELETE from above List?", _
vbQuestion + vbYesNo, "cmddelLink_Click()") = vbYes Then
    rst.Delete
    rst.Requery
    Me.DirectoryList.Form.Requery
    MsgBox "File Link: " & strFile & " Deleted."
End If
Else
    MsgBox "Link: " & strFile & " Not Found!!"
End If
rst.Close
Set rst = Nothing
Set db = Nothing

cmdDelLink_Click_Exit:
Exit Sub

cmdDelLink_Click_Err:
MsgBox Err & " : " & Err.Description, , "cmdDelLink_Click()"
Resume cmdDelLink_Click_Exit

End Sub

Private Sub cmdFileDialog_Click()
On Error GoTo cmdFileDialog_Click_Err
'Requires reference to Microsoft Office 12.0 Object Library.
Dim db As DAO.Database, rst As DAO.Recordset
   Dim fDialog As Office.FileDialog
   Dim varFile As Variant
Dim strfiles As String
   'Clear listbox contents.
   'Me.FileList.RowSource = ""

   'Set up the File Dialog.
   Set fDialog = Application.FileDialog(msoFileDialogFilePicker)
   With fDialog
      'Allow user to make multiple selections in dialog box.
      .AllowMultiSelect = True
      .InitialFileName = strpath
            
      'Set the title of the dialog box.
      .Title = "Please select one or more files"

      'Clear out the current filters, and add our own.
      .Filters.Clear
      .Filters.Add "All Files", "*.*"
      .Filters.Add "Access Databases", "*.mdb; *.accdb"
      .Filters.Add "Access Projects", "*.adp"
      .Filters.Add "Excel WorkBooks", "*.xlsx; *.xls; *.xml"
      .Filters.Add "Word Documents", "*.docx; *.doc"

      'Show the dialog box. If the .Show method returns True, the
      'user picked at least one file. If the .Show method returns
      'False, the user clicked Cancel.
      If .Show = True Then
    'i = .FoundFiles.Count
    'MsgBox "File found = " & .FoundFiles.Count
    'DoCmd.SetWarnings False
    'DoCmd.RunSQL "DELETE DirectoryList.* FROM DirectoryList;"
    'DoCmd.SetWarnings True
    Set db = CurrentDb
    Set rst = db.OpenRecordset("DirectoryList", dbOpenDynaset)
    'For i = 1 To .FoundFiles.Count
        For Each varFile In .SelectedItems
        rst.AddNew
        strfiles = Mid(varFile, InStrRev(varFile, "\") + 1)
        strfiles = strfiles & "#" & varFile & "##Click"
        rst![FileLinks] = strfiles
        rst![Path] = varFile
        rst.Update
    Next
Me.DirectoryList.Form.Requery
         'Loop through each file selected and add it to the list box.
         'For Each varFile In .SelectedItems
            'Me.FileList.AddItem varFile
         'Next
      Else
         MsgBox "You clicked Cancel in the file dialog box."
      End If
   End With

cmdFileDialog_Click_Exit:
Exit Sub

cmdFileDialog_Click_Err:
MsgBox Err & " : " & Err.Description, , "cmdFileDialog_Click()"
Resume cmdFileDialog_Click_Exit
End Sub

Private Sub Form_Unload(Cancel As Integer)
If Len(strpath) = 0 Then
  strpath = "C:\My Documents\*.*"
End If
SetProperty
End Sub

Private Sub PathName_AfterUpdate()
'On Error GoTo PathName_AfterUpdate_Err
Dim str_path As String, i As Long
Dim test As String

    Me.Refresh
    str_path = Me!PathName
    i = InStrRev(str_path, "\")
    str_path = Left(str_path, i) & "*.*"
    strpath = str_path
    
    test = Dir(strpath)
    If Len(test) = 0 Then
        MsgBox "Invalid PathName: " & strpath
        strpath = CurrentProject.Path & "\*.*"
        Me.PathName = str_path
        Me.Refresh
        Exit Sub
    End If
    Me.PathName = strpath
    Me.Refresh
    
PathName_AfterUpdate_Exit:
Exit Sub

PathName_AfterUpdate_Err:
MsgBox Err & " : " & Err.Description, , "PathName_AfterUpdate()"
Resume PathName_AfterUpdate_Exit
End Sub

Private Function GetProperty() As String
On Error GoTo GetProperty_Err
Dim doc As DAO.Document
Dim db As DAO.Database
Dim prp As DAO.Property
Dim strLoc As String

Set db = CurrentDb
Set doc = db.Containers("Forms").Documents("FilesListing")
strLoc = doc.Properties("defaultpath").Value
If Len(strLoc) = 0 Then
   strLoc = CurrentProject.Path & "\*.*"
End If

strpath = strLoc
Me!PathName = strpath
Me.Refresh

GetProperty_Exit:
Exit Function

GetProperty_Err:
MsgBox Err & " : " & Err.Description, , "GetProperty()"
Resume GetProperty_Exit
End Function


Private Function SetProperty() As String
On Error GoTo SetProperty_Err
Dim doc As DAO.Document
Dim db As DAO.Database
Dim prp As DAO.Property
Dim strLoc As String

Set db = CurrentDb
Set doc = db.Containers("Forms").Documents("FilesListing")
strLoc = Me!PathName
If Len(strLoc) = 0 Then
    strLoc = CurrentProject.Path & "\*.*"
End If
doc.Properties("defaultpath").Value = strLoc

SetProperty_Exit:
Exit Function

SetProperty_Err:
MsgBox Err & " : " & Err.Description, , "SetProperty()"
Resume SetProperty_Exit
End Function

Download Demo Database.

Download Demo DirListing2K1.zip

Share:

Combo-Box Column Values

Combo-Box Column Values.

The Text Boxes and Command Buttons are the most frequently used controls on a Microsoft Access form. They serve as the primary means of user interaction — Text Boxes for data input or display, and Command Buttons for triggering specific actions through macros or VBA procedures.

We have explored several techniques involving these controls in earlier articles, including how to enhance their functionality, improve their visual behavior, and automate form operations. For readers who have not encountered those posts before, the links to those articles are provided below for easy reference. Review them to gain a better understanding of how these controls can be customized and utilized effectively in your own applications.

  1. Command Button Animation
  2. Command Button Animation-2
  3. Double-Action Command Button
  4. Colorful Command Buttons
  5. Transparent Command Button

Next in line is the most preferred and familiar control on Forms: the Combo Box control. This versatile control permits users to select a value from a predefined list or type in a new one. The Combo Box can be created not only on Forms but also directly in Tables, providing an easy and efficient way to maintain data integrity and consistency.

If you would like to see a few examples of how Combo Boxes are used in Tables, you already have them on your PC. Open the Northwind.mdb sample database located at:

C:\Program Files\Microsoft Office\Office11\Samples\Northwind.mdb
(for Microsoft Office 2003 — the path may vary in later versions)

Now open the following Tables in Design View and observe the Field Properties:

  • Employees Table

  • Orders Table

  • Order Details Table

You will find several fields that use lookup lists, where the Display Control property is set to Combo Box. This helps restrict data entry to valid values while still allowing flexibility through a user-friendly dropdown list.

  1. Employees Table

    • Field: Title of Courtesy

    Note: Select the Lookup Tab from the Field Properties below. Inspect the Row Source Type and Row Source Property Values. Inspect the other related Property settings as well.

    The Row Source Property Values are keyed in as Constants separated by semicolons after setting the Row Source Type value as Value List. This is a single-column list.

    To enter values in a two-column list, the Column Count Property value must be 2, and based on that, the values entered into the Row Source property will be read in pairs to display.

    When using the constant values (Dr., Mr., Miss, Mrs., Ms.) as Source items for the ComboBox, it is assumed that values other than these are not likely to enter this field, but if necessary, you may enter them manually into the target field. The Limit To List Property Value setting of No suggests this.

    • Field: ReportsTo

    Note: The Row Source Property value EmployeelD is taken in the ReportsTo Field from the same Employees Table.

    The Row Source Type Value is Table/Query, and the Row Source Value is an SQL statement, which pulls data from selected fields from the Employees table itself.

    Here, the Limit To List property value is set to Yes, indicating that values other than what is appearing in the ComboBox (or in the Employee ID field) will not be accepted in the ComboBox Text Box to select or enter. In other words, you cannot enter a value manually into this field other than what is appearing in the combo box.

    The Combo-Boxes created in the Table Structure have more control over the data going into the target field than an external Combo-Box created on a Form. A Form or Query designed with this Table Column will have the Combo-Box attached to it when the Field is dragged from the Field-List to the Form or Query, or when you create a Form or Report with the built-in Wizards.

  2. If it is absolutely necessary to add a new value to the ComboBox then that should be added to the Source Table either manually or through a VBA Program first. After that, refresh the ComboBox contents so that the newly added value appears in the ComboBox's List. 

  3. Orders Table
    • CustornerlD
    • EmployeelD
    • Ship via

    Open the Orders Qry in normal view and click on one of the rows of the Customer Column to see the ComboBox in action on the Query.

  4. Order Details Table
    • ProductID

The Bound Column Property.

Normally, a Combo Box has one or more columns of information — for example, Employee ID and Employee Name. The value that is actually stored in the target field depends on the Bound Column property setting.

If the Bound Column is set to 1, then the first column value (usually the unique key, such as Employee ID) is saved into the field. The second column (for example, Employee Name) is displayed in the Combo Box for clarity and user convenience, but is not stored in the table.

This dual-column approach provides both efficiency and readability — users can easily identify records by name, while the database continues to work with the key values needed for relational integrity.

The Column Width Property must be set with Values like 0.5"; 1.5" for each column, and the List Width Property Value is equal to the value of all Column Widths added together.

Assume that our Employee Combo Box has three columns: EmployeeID, Employee Name, and Designation. When the user selects an employee from the Combo Box, not only should the EmployeeID be stored in the ReportsTo field, but the Designation should also be displayed automatically in another control (for example, a text box named txtDesignation) on the same Form.

This can be done with a single line of VBA code in the AfterUpdate or On Click event procedure of the Combo Box:

Me!txtDesignation = Me!cboEmployee.Column(2)

Here’s what’s happening in this line:

  • Me!cboEmployee refers to the Combo Box control on the Form.

  • .Column(2) refers to the third column (remember: column numbering starts from 0, so Column(0) = EmployeeID, Column(1) = Employee Name, and Column(2) = Designation).

  • The value from that column is assigned to the txtDesignation text box.

This method can be extended to extract and use values from multiple columns of the Combo Box to populate different fields or text boxes in the Form, all with just a few lines of code.

Private Sub EmployeeCombo_Click()
     Me![Designation] = Me!EmployeeCombo.Column(0,2)
 End Sub

The Row/column index numbers of combo boxes are 0-based, and the third column has an index value of 2.

The value 0 points to the First row in the Combo Box Value List, and the value 2 points to the third column value.

Earlier Post Link References:

Share:

Drill-Down Inquiry Screen-2

Continuation of Drill-Down Inquiry Screen.

Designing the Employee-Wise Order Summary Form

We will start by creating the top-level summary form that displays employee-wise order totals. This form will serve as the entry point for drilling down into the details of each employee’s sales performance.

  1. Create a New Form.

    • Open your database and create a new blank form in Design View.

    • Set its Record Source property to the query or table that summarizes orders by Employee — for example:
      qryEmployeeOrderSummary
      This query should include fields such as:

      • EmployeeID

      • EmployeeName

      • TotalOrders

      • TotalSales

  2. Add Controls

    • Add a Combo Box (cboEmployee) to allow selection of an Employee.

    • Add Text Boxes to display summary values:

      • txtTotalOrders

      • txtTotalSales

    • Add Labels with appropriate captions (e.g., “Employee”, “Total Orders”, “Total Sales”).

  3. Form Properties.

    • Set the Default View property to Single Form.

    • Set Allow Additions, Allow Deletions, and Allow Edits to No (this is a summary form, not for data entry).

    • Set the Border Style to Dialog and Pop Up to No.

  4. Add a Refresh Button.

    • Insert a small Command Button (cmdRefresh) with the caption “Refresh Summary”.

    • Add the following VBA code in its Click event to requery the form data:

      Private Sub cmdRefresh_Click() Me.Requery End Sub

This completes the Employee Summary layer — the top level of your drill-down screen.
Next, we’ll design the second-level subform to display Order-Wise Details for the selected employee and link it dynamically to the summary form.

03_Employee_Summary Form.

  1. Designing the Employee Summary Form.

    1. Select the Source Query.

      • Open the Database Window (or Navigation Pane in newer versions).

      • Locate and select the query named 03_Employee_Summary.
        This query should contain summary data for each employee, such as:

        • Employee ID

        • Employee Name

        • Number of Orders

        • Total Sales Amount

        • Region or City (if applicable)

    2. Create the Form Using the Form Wizard.

      • From the Insert menu, choose Form Wizard.

      • Select 03_Employee_Summary as the record source.

      • Add the following fields in this order (or as per your data):

        • EmployeeID

        • EmployeeName

        • OrdersCount

        • TotalSales

      • When prompted for the form layout, choose Tabular Form (Continuous Form).

      • Complete the wizard and give the form a suitable name, such as Employee_Summary.

    3. Clean Up the Design. 

      The Form Wizard may add unnecessary design elements, like background images, grid lines, and shadowed controls.

      • Open the form in Design View.

      • Remove any background image (set the Picture property to None).

      • Select all controls and set:

        • Special EffectFlat

        • Back ColorWhite or Transparent

        • Border StyleSolid

      • Adjust the Form Header to include a descriptive title such as “Employee Summary” in a bold label.

    4. Enhance Readability.

      • Align the text boxes neatly in columns.

      • Set the Alternate Back Color of the Detail section (e.g., a light grey) for easier row reading.

      • Format the TotalSales field as Currency.

      • Set OrderCount as a Number, with no decimal places.

    5. Save and Test the Form

      • Save the form as Employee_Summary.

      • Switch to Form View to verify that multiple employee records appear in a continuous list, as shown in the sample.

    Next Step:

    In the following section, we will design the Order Details Subform that will display order-level data for the employee selected in this summary form.

  2. Select all the data fields together by clicking on the left border of the Detail section. Alternatively, click anywhere within the Detail section and drag the mouse over all the controls to select them simultaneously.

  3. Display the Property Sheet (View ->Properties).

  4. Change the following Property Values:

    • Enabled = No
    • Locked = Yes
    • Tab Stop = No
    • Back Color = 12632256
    • Special Effect = Raised
  5. Expand the Detail Section of the Form down to get enough room to draw a lengthy Command Button.

  6. Draw a Command Button as wide as the full length of all the Fields above, so that we can cover the fields by placing it over them.

  7. Display the Property Sheet of the Command Button.

  8. Change the following Property Values:

    • Name = cmd1
    • Transparent = Yes
    • Hyperlink SubAddress = #
  9. We must make the Command Button's height the same as the Fields above. Click on the Command Button to select it, hold the Shift Key, and click on any one of the Fields above to select it along with the Command Button. Alternatively, you can click and drag over the Command Button and any one of the fields above.

  10. Select Format -> Size and select Shortest if the Command Button's height is more than the field, or select Tallest to make the Command Button as tall as the fields above.

  11. Drag the Transparent Command Button and place it over the Fields above.

  12. To make sure that the Transparent Command Button stays above all the data fields, select Format -> Bring to Front.

  13. Now, reduce the Detail Section height, but leave a little gap above and below the Data Fields.

  14. Draw a Text Box in the Form Footer Section below in the same position as the TORDERS field in the Detail Section and write the following expression in the Control Source Property:

    =Sum([TORDERS]) 
  15. Change the Caption of the child label to Total Orders.

  16. Create a Label at the Header of the Form and change the Caption value to EMPLOYEE-WISE ORDERS SUMMARY. Change the font size to 12.

  17. Display the Code Module of the Form (View -> Code), copy and paste the following VBA lines into the Module:

    Private Sub cmd1_Click()
    Me.Parent.Refresh
    Me.Parent.Tabctl0.Pages(1).SetFocus
    End Sub
  18. Save the Form with the Name: 03_Employee_Summary.

04_Order_ListQ Form.

  1. Select the Query 04_Order_ListQ and create a Tabular Form (continuous Form) as we did at the top.

  2. Change the design to look like the sample Image given below:

  3. Select all the fields as we did earlier and change the following Property Values:

    • Enabled = No
    • Locked = Yes
    • Tab Stop = No
    • Back Color = 16777215
    • Special Effect = Flat
  4. Follow Steps 6 to 8 given above.

  5. Change the following Properties of the Command Button:

    • Name = cmdOrder
    • Transparent = Yes
    • Hyperlink SubAddress = #
  6. Follow Steps 10 to 13 as explained above. Reduce the height of the Detail Section without leaving the gap above and below the fields.

  7. Create a Command Button at the Footer Section of the Form.

  8. Display the Property Sheet of the Command Button and change the following Property Values:

    • Name = cmdMain
    • Caption = Goto Main
  9. Expand the Header Section of the Form and drag the Field Headings down to get enough room to create a Heading for the Form.

  10. Add a Text Box above the Field Headings and write the following expression in the Control Source Property of the Text Box:

    = "Order List of " & [EmpName]
  11. Display the Code Module of the Form (View -> Code), copy and paste the VBA Code given below into the Module, and save the Form with the name 04_Order_ListQ.

Private Sub cmdMain_Click()
    Me.Parent.Tabctl0.Pages(0).SetFocus
End Sub

Private Sub cmdOrder_Click()
   Me.Parent.Refresh
   Me.Parent.Tabctl0.Pages(2).SetFocus
End Sub

05_Order_DetailQ Form

  1. Select the Query 05_Order_DetailQ and Create a Tabular Form.

    Here, we don't need the Transparent Command Button; change the Form design to look like the sample image below.

  2. Create a Text Box in the Form Footer below the Quantity field and write the following expression in the Control Source Property:

    =Sum([Quantity])
  3. Create another Text Box in the Form Footer below the ExtendedPrice Column and write the following expression in the Control Source Property:

    =Sum([ExtendedPrice])
  4. Create a Command Button in the Form Footer below the TextBoxes.

  5. Change the following Property Values of the Command Button.

    • Name = cmdBack
    • Caption = << Back

  6. Display the Code Module of the Form (View -> Code), copy and paste the following lines into the Module:

    Private Sub cmdBack_Click()
        Me.Parent.TabCtl0.Pages(1).SetFocus
    End Sub
  7. Save the Form with the Name 05_Order_DetailsQ.

Now, we are ready to design the Main Form Inquiry. Main to assemble all three Sub-Forms on a Tab Control and make the Tab Control Pages invisible.

Inquiry_Main Form.

  1. Select the Parameter Table Date_Param, select Form from the Insert Menu, and select Design View from the displayed list.

  2. Select the Tab Control Tool from the Toolbox and draw a Tab Control on the Detail Section of the Form.

  3. Check the sample image given below. The Tab Control will have only two pages, but we need one more page.

  4. Click on the Tab Control to select it and select Tab Control Page from the Insert Menu.

    You may select each Page of the Tab Control, display its Property Sheet, and change the Caption Property value of Page1, Page2, and Page3 as Summary, Orders, and Order Detail, respectively, if needed. It is used for reference purposes only.

    The next step is to drag and drop the Sub-Forms (03_Employees_Summary, 04_Order_ListQ, and 05_Order_DetailQ) one by one on the Tab Control Pages.

  5. Position the Database Window with the Forms Tab active and the Inquiry_Main Form with the Tab Control side by side.

  6. Drag and drop the 03_Employee_Summary Form on Tab Control Page 1.

  7. You may delete the child label attached to the subform. Resize both the subform and the tab control to ensure that the contents are displayed properly on the screen. Save the form with the name Inquiry_Main, and open it in Normal View to verify how the information appears in the subform. Check whether any adjustment to the size of the form or tab control, either an increase or a decrease, is required. Leave some space between the tab control and the top of the Detail section of the form to insert a few text boxes for the StartDate and EndDate fields, along with two additional text boxes for control purposes. Also, make sure to leave some space for a heading above these controls.

  8. Once you are satisfied with the subform’s dimensions and overall design, click on the subform and open the Property Sheet. Take note of the following property values on a piece of paper — you will need them later to resize and position the other two forms that will be inserted into Page 2 and Page 3 of the Tab Control.

    • Top
    • Left
    • Width
    • Height
  9. Right-click on the Sub-Form and select Copy from the displayed Shortcut Menu.

  10. Select Tab Control Page2, press and hold the Shift Key, right-click on the Tab Control Page2, and select Paste from the displayed menu.

    The pasted control will be an empty form displaying the Source Object Name of the copied Form with a white background.

  11. Display the Property Sheet of the Form and change the Source Object Property value to 04_Order_ListQ. After this change, the Form will appear on the Tab Control Page 2.

  12. Change the dimension property values to match the ones you noted earlier. Since you copied the form (rather than dragging and dropping it from the Database Window), you only need to update the Top and Left property values — the Width and Height values should already be the same. If they differ, adjust them accordingly.

  13. Follow Steps 9 to 12 above to bring in the 05_Order_DetailQ Form to the third Page of the Tab Control.

  14. Display the Field List (View -> Field List) if it is not visible.

  15. Drag and drop StartDate and EndDate fields above the Tab Control, create labels above and left, and change their Caption values as shown in the design above.

  16. Create a Command Button to the right of the EndDate field and change its property values as given below:

    • Name = cmdRefresh
    • Caption = <<Refresh Screen

    The Date fields we created, along with two additional text boxes that we will add, will be referenced in the queries we designed earlier to filter the data displayed on the forms. Although the refresh action is not strictly required—since the data is refreshed automatically before the results are displayed—it serves as an additional feature that allows the user to manually refresh and update any recent changes.

  17. Create a Text Box to the right of the Command Button and display its property sheet, and change the following Property Values:

    • Name = EID
    • Control Source = =[03_Employee_Summary].Form!EmployeeID
    • Visible = No
  18. Create another Text Box below the earlier one and change the property values as given below.

    • Name = OID
    • Control Source = =[04_Order_ListQ].Form!OrderID
    • Visible = No
  19. Create a heading on top of the Form with the Caption Value SALES PERFORMANCE INQUIRY.

  20. Create a Command Button below the Tab Control and change the following property values:

    • Name = cmdQuit
    • Caption = Quit

    Now, we make the Tab Control disappear, and the Tab Control's appearance will change. It will not look like a Tab Control after the change.

  21. Click on the Tab Control, display the Property sheet, and change the following property values:

    Caution: After changing the property values, make sure to click the Save button on the toolbar or choose Save from the File menu to preserve your changes immediately. In Microsoft Office 2000, attempting any other action before saving may cause the form to lock up.

    • Back Style = Transparent
    • Multirow = No
    • Style = None
  22. Display the Code Module of the Form, copy, and paste the following few lines of code into the Module:
    Private Sub cmdQuit_Click()
      DoCmd.Close acForm, Me.Name
    End Sub
    
    Private Sub cmdRefresh_Click()
       Me.Refresh
    End Sub
    
    Private Sub EndDate_LostFocus()
    Me.Refresh
    End Sub
    
    Private Sub Form_Load()
    Me.TabCtl0.Pages(0).SetFocus
    End Sub
  23. We will finish the design by setting the Property Values of the Inquiry_Main Form. Display the Property Sheet of the Form and change the following Property Values:
    • Allow Edits = Yes
    • Allow Deletions = No
    • Allow Additions = No
    • Data Entry = No
    • Scroll Bars = Neither
    • Record Selectors = No
    • Navigation Buttons = No
    • Dividing Lines = No
    • Auto Re-size = Yes
    • Auto Center = Yes
    • Pop up = Yes
    • Modal = No
    • Border Style = Dialog
    • Control Box = Yes
    • Min Max Buttons = None
    • Close Button = Yes
    • Allow Design Changes = Design View Only
  24. Save the Form, open it in Normal View, and try out your creation.

    Note: If you encounter any issues while running your design, refer to the downloaded sample database. Compare your design with it to identify and correct any mistakes.

Share:

PRESENTATION: ACCESS USER GROUPS (EUROPE)

Translate

PageRank

Post Feed


Search

Popular Posts

Blog Archive

Powered by Blogger.

Labels

Forms Functions How Tos MS-Access Security Reports msaccess forms Animations msaccess animation Utilities msaccess controls Access and Internet MS-Access Scurity MS-Access and Internet External Links Queries Array Class Module msaccess reports Accesstips msaccess tips WithEvents Downloads Objects Menus and Toolbars MsaccessLinks Process Controls Art Work Collection Object Property msaccess How Tos Combo Boxes ListView Control Query VBA msaccessQuery Calculation Dictionary Object Event Graph Charts ImageList Control List Boxes TreeView Control Command Buttons Controls Data Emails and Alerts Form Custom Functions Custom Wizards DOS Commands Data Type Key Object Reference ms-access functions msaccess functions msaccess graphs msaccess reporttricks Command Button Report msaccess menus msaccessprocess security advanced Access Security Add Auto-Number Field Type Form Instances ImageList Item Macros Menus Nodes Recordset Top Values Variables msaccess email progressmeter Access2007 Copy Excel Expression Fields Join Methods Microsoft Numbering System RaiseEvent Records Security Split SubForm Table Tables Time Difference Utility WScript Workgroup Wrapper Classes database function msaccess wizards tutorial Access Emails and Alerts Access Fields Access How Tos Access Mail Merge Access2003 Accounting Year Action Animation Attachment Binary Numbers Bookmarks Budgeting ChDir Color Palette Common Controls Conditional Formatting Data Filtering Database Records Defining Pages Desktop Shortcuts Diagram Disk Dynamic Lookup Error Handler Export External Filter Formatting Groups Hexadecimal Numbers Import Labels List Logo Macro Mail Merge Main Form Memo Message Box Monitoring Octal Numbers Operating System Paste Primary-Key Product Rank Reading Remove Rich Text Sequence SetFocus Summary Tab-Page Union Query User Users Water-Mark Word automatically commands hyperlinks iSeries Date iif ms-access msaccess msaccess alerts pdf files reference restore switch text toolbar updating upload vba code