Learn Microsoft Access Advanced Programming Techniques, Tips and Tricks.

Showing posts with label Command Buttons. Show all posts

Command Button Color Change on Mouse Button-down Action

Introduction.

After working with the Command Button and Message Box Controls of MS-Access I really got bored with their styles. So, I set out to do something about it and created some animation styles for the command buttons and used Office Assistant (valid only for Access2003 and earlier versions) for Message Boxes. The Links to those Articles and free downloads links are given below:

    Command Button Styles

  1. Command Button Animation
  2. Command Button Animation-2
  3. Colorful Command Button

    Message Box Styles (Access2003 or earlier versions only)

  4. Message Box with Office Assistant
  5. MsgBox with Options Menu
  6. MsgBox with Checkbox Menu

Some New Trick on Command Button.

Here is a new trick for you to use on Command Button Control. Command Button will change the color on the mouse button down the action and will restore the original color on the mouse-up action.  You can do this with a Label control, with the same dimension as the Command Button, filled with the color you like, and by placing it behind the Command Button Control.  You need two lines of VBA Code on the Form Module as well.


Design the New Animation Style.

Let us go through with this simple design and enjoy the new animation style of the Command Button Control.

  1. Open a new Form.

  2. Create a Command Button Control on the Detail Section of the Form.

  3. Display the Command Button’s Property Sheet (F4).

  4. Change the Name Property Value to cmdClose.

  5. Change the Caption Property Value to Close.

  6. Create a Label Control with some caption text near the Command Button.

  7. Select the Command Button and the Label Control together.

  8. Right-click on it and highlight the Size option on the Shortcut Menu and select To Tallest.

  9. Repeat step 8 above and select To Widest.

  10. Click on the Label Control alone and display its Property Sheet (F4).

  11. Remove the text from the Caption property.

  12. Change the Special Effect Property value to Raised.

  13. Select the Back Color Property and click on the Build ( . . .) button to display the Color Palette.

  14. Select the color you like to fill the background of the label control.

  15. Move the Label control behind the Command Button control and place it completely hidden.

  16. If the label control is overlapping the Command Button then display the Shortcut Menu by right-clicking on it and selecting Send to Back from the Position group.

  17. Click on the Command Button and display the property sheet (F4).

  18. Click on the Event Tab and select the Mouse down Event, select [Event Procedure] from the drop-down control and click on the build (. . .) button to open the Form’s VBA Module Window.

  19. Copy and Paste the following Code into the Form Module, over-writing the existing two empty lines that appeared there:

    Private Sub cmdClose_MouseDown(Button As Integer, Shift As Integer, X As Single, Y As Single)
      Me.cmdClose.BackStyle = 0 'transparent
    End Sub
  20. Repeat step 18 for Mouse Up [Event Procedure] and copy and paste the following Code into the Form Module:

    Private Sub cmdClose_MouseUp(Button As Integer, Shift As Integer, X As Single, Y As Single) 
        Me.cmdClose.BackStyle = 1 'Normal 
    End Sub

Test Run.

Now, it is time for the test run of our design. 

  1. Save the Form with the name frmButton.

  2. Open frmButton in Form View.

  3. Click on the Command Button and hold the mouse button down.  You will see the Command Button’s Color changes to the background fill color you have selected for the label control and Command Button caption-text Close appearing on it.

  4. Release the mouse button.  The original state of the Command Button is restored.

The trick works by changing the Back Style of the Command button to transparent, forcing it to display the color of the Label control behind it and changing to a Normal view when the mouse button is released. 

You can learn another trick from an earlier Article on Transparent Command Button, here.

  1. Command Button Animation
  2. Double Action Command Button
  3. Colorful Command Buttons
  4. Transparent Command Button
  5. Command Button Animation-2
  6. Creating Animated Command Button with VBA
  7. Command Button Color Change on Mouse Move

Share:

Creating Animated Command Button with VBA

Introduction.

The first blog post that I have written about is the Command Button Animation method in September 2006 on this Web site.  I used this animation method in almost all my Projects.  The command buttons responding to the mouse moves over them presented a sense of life to the Forms, which otherwise remained rigid and boring.  The Command Button and a Rectangle control set with shadow special-effect designed manually. 

The Mouse_move() Event Procedures in the form are written manually to call a Function to do the job of animation.  I suggest you go through the earlier blog post to get a general idea before continuing.  To go to the earlier Article click here.

Now, we will see how to create the Animated Command Button with its animation programs (for each button) on the Form Module, during Form design time with the click of a button.

Animated Button Creation Code.

With two VBA routines, we can do this very easily.

  1. Open one of your databases.

  2. Display the Standard VBA Module.

  3. Create a new Standard Module (Insert - - > Module).

  4. Copy both the following Functions into the Standard Module and save the code:

Command Button Animation Code:

Public Function BAnimate(ByVal strForm As String, ByVal mode As Integer, ByVal lblName As String)
'---------------------------------------------------------------------------
'Author : a.p.r. pillai
'Date   : July 1998
'Remarks: Animates the Command Button
'Rights : All Rights Reserved by www.msaccesstips.com
'---------------------------------------------------------------------------
Dim Frm As Form, l As Long, t As Long

On Error GoTo BAnimate_Err

Set Frm = Forms(strForm)

l = Frm.Controls(lblName & "Box").Left
t = Frm.Controls(lblName & "Box").Top

If (mode = 1) And (Frm.Controls(lblName & "Box").Visible = False) Then
    Frm.Controls(lblName & "Box").Visible = True
        Frm.Controls(lblName).Left = l - (0.0208 * 1440)
        Frm.Controls(lblName).Top = t - (0.0208 * 1440)
        Frm.Controls(lblName).FontWeight = 700
ElseIf (mode = 0) And (Frm.Controls(lblName & "Box").Visible = True) Then
    Frm.Controls(lblName & "Box").Visible = False
        Frm.Controls(lblName).Left = l
        Frm.Controls(lblName).Top = t
        Frm.Controls(lblName).FontWeight = 400
End If

BAnimate_Exit:
Exit Function

BAnimate_Err:
Err.Clear
Resume BAnimate_Exit

End Function

Animated Command Button Creation Code:

Public Function CreateButton(ByVal intSection As Integer, strName As String)
'---------------------------------------------------------------------------
'Author : a.p.r. pillai
'Date   : Aug. 2000
'Remarks: Creates animated command button controls and Programs on a Form
'       : at design time of the form.
'Rights : All Rights Reserved by www.msaccesstips.com
'---------------------------------------------------------------------------
'Program Parameter Values : intSection
'     0 =  Form Detail Section
'     1 =  Form Header Section
'     2 =  Form Footer Section
'                         : strName
'Command Button Name Property Value
'The Name will be prefixed with the text 'cmd'
'Example: Edit will be modified as cmdEdit
'Sample Run : CreateButton 0,"Edit"
'Remarks    : If more than one Form is opened in Design View then the
'           : Command Button will be created on the first Form
'---------------------------------------------------------------------------
Dim Frm As Form, Ctrl As Control, txt As String
Dim vLeft As Long, vTop As Long, vWidth As Long, vHeight As Long
Dim i As Long, dif As Double, x As Long, Y As Long, z
Dim frmViewStatus As Integer, frmsCount As Integer, j As Integer
Dim hfd As String
On Error Resume Next

i = 1440
dif = 0.0208 * i
vLeft = 0.25 * i
vTop = 0.0521 * i
vWidth = 1.25 * i
vHeight = 0.2375 * i

frmsCount = Forms.Count - 1
frmViewStatus = False
For j = 0 To frmsCount
    If Forms(j).CurrentView = 0 Then
      Set Frm = Forms(j)
      frmViewStatus = True
      Exit For
    End If
Next
If frmViewStatus = False Then
   MsgBox "Open a Form in Design View then try again." & vbCr & vbCr & "Program CreateButton() Aborted."
   Exit Function
End If

  Set Ctrl = CreateControl(Frm.Name, acRectangle, intSection, , , vLeft, vTop, (vWidth - dif), (vHeight - dif))
  
  With Ctrl
    .Name = "cmd" & strName & "Box"
    .SpecialEffect = 4
    .BorderWidth = 3
  End With

  Set Ctrl = CreateControl(Frm.Name, acCommandButton, intSection, , strName, vLeft, vTop, vWidth, vHeight)
  
  With Ctrl
    .Name = "cmd" & strName
    .Caption = strName
  End With
   
  x = Frm.Module.CreateEventProc("MouseMove", Ctrl.Name)
  
  txt = "BAnimate me.name, 1, " & Chr(34) & "cmd" & strName & Chr(34)
  Frm.Module.InsertLines x + 1, txt

  hfd = Choose(intSection + 1, "Detail", "FormHeader", "FormFooter")

  z = Frm.Module.ProcBodyLine(hfd & "_MouseMove", vbext_pk_Proc)

  If z = 0 Then
      x = Frm.Module.CreateEventProc("MouseMove", hfd)
  Else
      x = z + 1
  End If

  txt = "BAnimate me.name, 0, " & Chr(34) & "cmd" & strName & Chr(34)
  Frm.Module.InsertLines x + 1, txt


CreateButton_Exit:
Exit Function

CreateButton_Err:
Resume CreateButton_Exit
End Function

Press Ctrl+S to save the programs. Keep the VBA Window open.

Do the Test Run.

Now that you have the main functions for creating and animating Command Buttons, let us do a quick run to see how easy it is.

  1. Close all open forms, if any.

  2. Open a new Form in Design View.

  3. Display the VBA window, if it was closed or minimized (Alt+F11).

  4. Display the Debug Window (Immediate Window) - Ctrl+G.

  5. Type the following statement in the Debug Window and press Enter Key:

CreateButton 0,"Edit"
  • The first Parameter value 0, represents the Form's Detail Section (0=Detail, 1=Form Header, 2=Form Footer), where we want the Command Button to appear.

  • The second parameter “Edit” is the Command Button's Name (will be modified as cmdEdit and set in the Name property) and Caption value. The second parameter must be always a single word. This is absolutely necessary to create the MouseMove Event Procedure correctly on the Form's Module. The Caption of the Command Button can be changed later, if necessary.

  1. Minimize the VBA window to show the Form in Design View.  You can see the Command Button is created in the Detail Section of the Form with the Caption Edit.

  2. Change the Form into Form View.

  3. Move the Mouse over the Command Button.  The button moves up a little and to the left to show a shadow at the bottom and to the right of the Command Button.

  4. Move the mouse out of the button.  The Command Button settles back to the original position hiding the shadow.

  5. Repeat this action in quick succession.  You can see the movement of the button more clearly.

    The VBA Code is Written by the Program.

    If you display the Form's VBA Module you can see that the following VBA Program lines are written into it:

    Private Sub cmdEdit_MouseMove(Button As Integer, Shift As Integer, X As Single, Y As Single)
         BAnimate Me.Name, 1, "cmdEdit"
    
    End Sub
    
    Private Sub Detail_MouseMove(Button As Integer, Shift As Integer, X As Single, Y As Single)
        BAnimate Me.Name, 0, "cmdEdit"
    
    End Sub
  6. Change the Form mode to Design View again.

  7. Click on the Command Button to select it.

  8. Drag the Command Button to the right and down to show the Rectangle Control with the special effect shadow underneath it.

    The Command Button and the Rectangle Control together make the animation trick.  Click somewhere near the Command Button and drag the Mouse over it to select them together and drag them to the intended location. Do this before you attempt to create another Command Button in the same section of the Form, otherwise, the next one will be created and placed over the earlier one.  New Command Buttons are always created in the same location in the Form Section.

  9. Right-Click on the Detail Section of the Form and select Form Header/Footer to display them on the Form.

Creating Button on Header or Footer Section.

Now, you may try the CreateButton() Function with the first parameter value 1 or 2 to create Command Buttons in the Form Header or Form Footer Sections respectively.  The Second parameter, the Name of the Command Button must be different for all Command Buttons on the same Form.  Sample statements for creating Animated Command Buttons on the Header and Footer of the Form are given below:

CreateButton 1, "PrintPreview"

CreateButton 2, "Exit"

NB: Keep the Header/Footer Sections visible before you attempt to create Command Buttons on them.  There should not be more than one form in Design View.  Otherwise, the first form found in the design mode will be selected for creating the button controls.

During the design time of the form running the CreateButton() Function from the Debug Window is the most convenient method.  But, if you look for something different like launching the program from a Command Button Click then we can do that too. 

Button Creation from a Command Button Click.

We can create a Command Button on a Form to click and input parameter values for the button creation program and quickly create it on the Form currently in Design View and build its Sub-Routines on the Form Module as well.
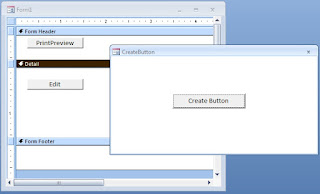
  1. Open a new Form in Design View.

  2. Create a Command Button as you do normally.

  3. Display its Property Sheet when the Command Button is in the selected state (F4).

  4. Change the Name property value to cmdCreate and set the Caption property value to Create Button.

  5. Display the Form's VBA Module (Alt+F11).

  6. Copy and Paste the following Code into the Module and press Ctrl+S to save the Form with the name frmCreateButton:

    Private Sub cmdCreate_Click()
    Dim intSection As Integer, strButtonName As String
    Dim msg As String
    msg = "Form Section (0,1 or 2)" & vbCr
    msg = msg & "0 - Form Details" & vbCr
    msg = msg & "1 - Form Header" & vbCr
    msg = msg & "2 - Form Footer"
    
    intSection = 3
    Do While intSection < 0 Or intSection > 2
        intSection = Nz(InputBox(msg, "cmdCreate_Click()"), 0)
    Loop
    
    strButtonName = ""
    Do While Len(strButtonName) = 0
        strButtonName = InputBox("Command Button Name", "cmdCreate_Click()")
    Loop
    
       If (intSection >= 0 And intSection < 3) And Len(strButtonName) > 0 Then
           CreateButton intSection, strButtonName
       End If
    
    End Sub

    Perform a Demo Run

  7. Open a form in Design View and display the Form’s Header/Footer Sections.

  8. Open the frmCreateButton in Normal View.

  9. Click on the Command Button to enter the parameter values of the program.

  10. Input one of the values (0, 1, or 2) suggested by the Prompt to select a Section of the Form and press the Enter Key or Click OK button.

  11. Enter a Name for the Command Button in the second prompt (it should be a single word like PrintPreview) and press Enter Key or Click OK.

  12. The Command Button controls are created on the selected Section of the form you kept open in the design view.

If you want to use this method on all your Projects then you may transfer the first two Functions (BAnimate() and CreateButton()) Codes into a common Library Database and attach them as Reference Library File (refer to the Blog Post Command Button Animation to know how to do this) to your Projects.

  1. Command Button Animation
  2. Double Action Command Button
  3. Colorful Command Buttons
  4. Transparent Command Button
  5. Command Button Animation-2
  6. Creating Animated Command Button with VBA
  7. Command Button Color Change on Mouse Move

Share:

Command Button Animation-2

Introduction.

A Screen with Animated Text or Controls gives the application a lively look and feel than a rigid screen to the user and to the onlooker. Command Button Animation was the first Blogpost that I have published on this Website.

Another Screen design improvement was creating 3D headings on Form and Report with different Fonts, Sizes, and Styles. Initially, create them manually and this leads to the creation of a 3D-Text Wizard.

You can find the details of 3D Text Styles in the following Posts.

  1. Create 3D Headings on Forms
  2. Border 2D Heading Text
  3. Border 3D Heading
  4. Shadow 3D Heading Style

IBM AS400 (iSeries) Screens influenced me to go along with designing MS-Access Screens with a dark background, data labels with light shades, and Text in Green. Even though these are old text-based screens better visibility of information is the main attraction of these screens.

But, when I started designing them I faced a little problem with the Command Button Animation that was in use till that time because it was not designed for dark backgrounds. I had to invent a different animation method around the original command button. It is simple to design besides easy to implement without the use of too complex VBA Code.

So, here it is for you and I hope you like it too. First, we will implement it with a simple and easy-to-understand method. After that, we will write a common routine that can drive the animation on any form with one or two lines of code.

Command Button Design.

  1. Open a new Form or an existing one.

  2. Select the Footer of the Form. If it is not visible select Form Header/Footer from View Menu.

  3. Display the Property Sheet (View - ->Properties).

  4. Change the Back Color Property Value to 0.

  5. Select the Command Button Tool from Toolbox and draw a Command Button in the Footer Section of the Form.

  6. Display the Property Sheet of the Command Button.

  7. Change the Name Property Value to cmdExit and Caption property value to Exit.

  8. Select the Rectangle Tool from Toolbox and draw a rectangle around the Command Button as shown in the sample design below:

  9. Give a little more gap, between the button and the rectangle at the bottom and the right side than above and left, giving it a feel that the Command Button is in a raised state.

  10. Click on the Rectangle and display its Property Sheet.

  11. Change the Name Property Value to ExitBox and the Visible Property Value to No.

    Animating the Command Button

    Now, it is time to implement the animation trick. This time, we will not animate the button like we did earlier on the Command Button Animation; instead, the Box around it will be made visible or hidden based on the Mouse movement over the Command Button.

    We will track the mouse movement in Code. When the mouse is over the Command Button the rectangle is made visible and when the mouse moves out it is hidden. When this action is repeated it will look like the command button become raised and goes flat again. It has a better look and feels in a dark background rather than remains flat all the time.

    We need to place Code at two places to trap the mouse movements, on the On Mouse Move Event of the Command Button and on the On Mouse Move Event in the Form Footer.

  12. Select the Command Button.

  13. Display the Property Sheet of the Command Button (View - ->Properties).

  14. Select [Event Procedure] in the On Mouse Move property and click on the build button (. . .).

  15. Copy and paste the code given below, between the sub-routine skeleton. You can ignore the first and last lines while copying as these will be present in the Module.

    Private Sub cmdExit_MouseMove(Button As Integer, Shift As Integer, X As Single, Y As Single)
         If Me.ExitBox.Visible = False Then
               Me.ExitBox.Visible = True
         End If
    End Sub
    
  16. Click anywhere within the Form Footer, to select that area, display the Property Sheet, and repeat Step-14 above.

  17. Copy and paste the following code into the empty skeleton of the sub-routine, as you did above:

    Private Sub FormFooter_MouseMove(Button As Integer, Shift As Integer, X As Single, Y As Single)
       If Me.ExitBox.Visible = True Then
          Me.ExitBox.Visible = False
       End If
    End Sub
    

    Actually, the IF. . .Then statement is not required in the routine. This is introduced to avoid changing the value repeatedly during mouse movements and to avoid flickering.

    Trial Run of Animation

  18. Save the Form and open it in Normal view.

  19. Move the Mouse over and out of the Command Button repeatedly which will give the button a sense of going flat and raised state every time.

    The AnimateFrame() Function

    When we implement this animation at several places duplicating the above code everywhere is not good programming. A common routine is given below that can be called with a one-line code so that it is easy to implement anywhere and for any number of buttons.

  20. Copy and paste the code given below into a Global Module of your database and save it.

Public Function AnimateFrame(ByVal OnOff As Boolean, ByVal x_Box As String)
Dim frm As Form, ctrl As Control
On Error GoTo AnimateFrame_Err

Set frm = Application.Screen.ActiveForm
Set ctrl = frm.Controls(x_Box)

Select Case OnOff
    Case False
        If ctrl.Visible = False Then Exit Function
             frm.Controls(x_Box).Visible = False
    Case True
        If ctrl.Visible = True Then Exit Function 
        frm.Controls(x_Box).Visible = True
End Select

AnimateFrame_Exit:
Exit Function

AnimateFrame_Err:
Resume AnimateFrame_Exit
End Function

Now, we can replace the code we have written earlier with a single-line Code each to display and hide the rectangle.

If Me.ExitBox.Visible = False Then

    Me.ExitBox.Visible = True

End If

The above code can be replaced with the statement

AnimateFrame True, "ExitBox"

in the On Mouse Move of Command Button and

If Me.ExitBox.Visible = True Then
    Me.ExitBox.Visible = False

End If

can be replaced with the statement

AnimateFrame False, "ExitBox"

in the FormFooter_MouseMove event procedure.

  1. Command Button Animation
  2. Double Action Command Button
  3. Colorful Command Buttons
  4. Transparent Command Button
  5. Command Button Animation-2
  6. Creating Animated Command Button with VBA
  7. Command Button Color Change on Mouse Move

Share:

Transparent Command Button

Introduction.

Command buttons on forms can be hidden by setting their Transparent or Visible property value = 'No', and then made visible again when a specific condition is met or when a particular user opens the form.

Example:
In a secured database where a form is routed through a network for data verification and approval by multiple users, you could:

  • Create separate command buttons for each user role.

  • Show each button only when the relevant user opens the form.

  • Base visibility on the verification status set by users of a lower rank.

The most common approach in such scenarios is not to hide the button, but to disable it while keeping it visible, and then enable it when required. Setting an active button’s Enabled or Visible property cannot be set to 'No'. You must first move the focus to another control before making the change in VBA.

The Transparent property does not have this limitation. You can make a command button invisible by setting the Transparent Property value to'Yes'.

However, there is a side effect:
If a user knows the exact location of the invisible button, clicking that spot will still trigger its action. To prevent this, you can “park” the invisible button in a different location at runtime by modifying its Left property.

  • Before moving the button, save its current Left position to a module-level global variable.

  • When it’s time to restore the button, use the saved value to reposition it in its original location.

Designing a Table and Form.

Here, we will use the Transparent Command Button for a Main Switchboard Menu.

  1. Design a Table using the Structure shown below and enter a few sample records as given below.

  2. Use the Form Wizard to design a Tabular Form for the above table and save it with the name DataFiles.

  3. Open the Form in Design view. Keep the ID,  Desc fields, and remove other columns. Keep the Shift Key down and click on both Fields to select them together. Or click outside the Fields and drag the mouse over to select them both.

  4. Display the Property Sheet (View -> Properties) and change the Following Property Values.

    • Enabled = No

    • Locked = Yes

    • Top = 0.0417"

    • Height = 0.1771"

    • Back Style = Normal

    • Back Color = -2147483633

    • Special Effect = Raised

    • Border Style = Solid

    • Border Color = 0

    • Border Width = Hairline

    • ForeColor = 0

  5. Select View Menu and remove the check mark from the Form Header/Footer Option. Select Yes to the Warning message to delete the Header/Footer Sections from the Form.

  6. Click on the top left corner of the Form to deselect all controls and select the Form. Display the Form Property Sheet (View -> Properties) and change the following Form Property Values.

    • Form Width = 2.5417"

    • Default view = Continuous Forms

    • Views Allowed = Form

    • Allow Edits = No

    • Allow Additions = No

    • Allow Deletions = No

    • Record Selectors = No

    • Navigation Buttons = No

    • Dividing Lines = No

    • Scrollbars = No

    • Border Style = None

    • Control Box = No

    • Min Max Buttons = None

    • Close Button = No

    • What this Button=No

    • Allow Design Changes = Design View Only

  7. Draw a Command Button about the size of both Field widths put together somewhere below the Fields so that we can modify the properties of the Command Button and place it over both the Fields in a transparent state.

  8. Select the Command Button and display the Property Sheet. Change the following Property Values:

    • Name = cmdMenu

    • Transparent = Yes

    • Height = 0.1771"

  9. Click on the On Click Property and select Event Procedure from the Dropdown List, and click on the Build (...) button to open the Form's VBA Module.

    Here we can write code to test the ID Value of the record clicked by the User and open the Form corresponding to that Number.

    The VBA Code for a simple method to test and open the Form corresponding to the ID number of the record clicked is given below.

  10. Copy and paste the following code into the VBA Module of the DataFiles Form and save the Form.

    Private Sub cmdMenu_Click()
    Dim IDNumber As Integer, strForm As String
    
    IDNumber = Me![ID]
    strForm = ""
    Select Case IDNumber
        Case 1
           strForm = "CRREQ_MASTER"
        Case 2
           strForm = "Dept_Codes"
        Case 3
           strForm = "Branch"
    End Select
    If Len(strForm) > 0 Then
       DoCmd.OpenForm strForm, acNormal
    End If
    End Sub
    

    Note: A more powerful and reusable method for handling this functionality is explained in my earlier article, Opening Access Forms. I recommend going through that article, as the method described there is very simple to implement in any project.

    In this example, the sample table shown earlier has been adapted from that article’s example, with additional fields (Forms, Macro, and Type). If you use the code provided in that article, you can add any number of records to this table without needing to test each ID value individually, as was required in the earlier approach.

    This method also allows you to:

    • Open a form directly, or

    • Run a process via a macro and, at the end of the process, open a form to display results.

    You can control this behavior by setting the Type field value to 0 or 1 when inserting a new record.

    To implement this with your command button, drag the transparent button (or, for precise positioning, use Ctrl + Arrow Keys in Office 2000 or the Arrow Keys alone in Office 2003 after selecting it) and place it directly over the ID and Desc fields, as shown below.

  11. Click on the Detail Section of the Form and Display the Property Sheet. Change the Details Section height.

    • Detail Section Height = .25"

    The completed form design will appear as shown in the image below when viewed in Normal View. This form will function as a subform on the Control Screen (Main Switchboard) for our Data Files menu.

    If you prefer not to display the serial numbers on the left side, simply set the Visible property of that field to No in the Property Sheet.


    Trial Run

    Open the Main Switchboard form of your project (or any other form you’d like to test with) and drag the form you created in the previous step onto it.

    In my example, I placed the menu form on the sample Switchboard form used in the Colorful Command Buttons article.

  12. Click on the Sub-Form, Display the Property Sheet, and change the following Property Values:

  • Special Effect = Flat

  • Border Style = Transparent

The transparent command button instances now appear above each record in the form and will respond to user clicks. Using VBA, you can detect which record was clicked and open the form associated with that record’s ID.

When new records are added to the menu table, they will automatically appear in the menu—no design changes required.

Test the menu by replacing the sample form names in the code with actual form names from your project.

  1. Command Button Animation
  2. Double Action Command Button
  3. Colorful Command Buttons
  4. Transparent Command Button
  5. Command Button Animation-2
  6. Creating an Animated Command Button with VBA
  7. Command Button Color Change on Mouse Move

Share:

Colorfull Command Buttons

Introduction.

We have seen the Double-Action Command Button in an earlier Post and Command Button Animation before, and now it is time to add some color to the Command Buttons. Take a look at some different Command Buttons in action on a Control Screen (Main Switchboard) of a sample MS-Access Application.

Would you like to use these colorful buttons in your own application?

You might be expecting a long lecture from me about their setup — maybe a hundred lines of VBA code tucked away at the end of this article for you to copy and paste. Or perhaps you’re bracing yourself to download some MS Access add-ons, link a couple of library files, and wrestle with complex installations.

Well… none of that is needed.

In fact, you can create one of these buttons in just two minutes — maybe three the first time you try. Once you’ve made one, you can produce variations in under a minute.

Here’s the twist: these buttons are not created inside MS Access at all. Instead, we make them in MS Word (or Excel, if you prefer), then copy and paste them straight into an Access form. After that, just tweak a few settings in the Property Sheet, add maybe one or two lines of VBA for animation, and you’re ready to roll. 

Designing the Button.

  1. Open your MS Access project and open a form in Design View.

  2. Launch MS Word and check whether the Drawing Toolbar is visible at the bottom, just above the status bar.

    • If it’s not visible, go to View → Toolbars → Drawing.

    • If the Drawing Toolbar button is already visible, then click it to display the toolbar.

  3. On the Drawing Toolbar, click AutoShapes → Basic Shapes → Rounded Rectangle.

  4. Draw a Rounded Rectangle on the Word document.

  5. Right-click the shape you just created and choose Format AutoShape from the shortcut menu.

  6. In the Format AutoShape dialog box, go to the Colors and Lines tab.

  7. Under the Fill group, open the Color drop-down list to select your preferred fill color.

  8. Click on the Yellow color on the Color Palette, and then click on the Fill Effects. Control.

  9. In the Fill Effects dialog box, select the Gradient tab.

    • Under Shading Styles, choose Vertical.

    • In the Variants section, click the shape at the bottom right corner.

    • The selected gradient will appear under the Sample preview on the right.

  10. Click OK, and then click OK again in the Format AutoShape dialog to apply the chosen gradient to the Rounded Rectangle.

  11. Right-click the shape and select Edit Text from the shortcut menu.

  12. Type the button caption—for example, Data Files. Highlight the text and apply the desired formatting using Word’s standard tools:

    • Align Center

    • Bold

    • A font color that provides good visibility against the gradient background.

  13. Note: Once you copy and paste the button into an MS Access form, you cannot change its caption or formatting there. It’s a good practice to keep a copy of the original buttons in the Word document. If you need changes later, edit them in Word, then copy and paste the updated version into Access.

    You can make copies of this Button and follow from Step 5 above to change the Gradient Color and Caption according to your needs.

  14. Tips: You can easily change the shape of your created buttons:

    • On the Drawing toolbar in Word, open the Draw menu.

    • Select Change AutoShape, then choose any shape you prefer for your button.

    To insert the button into Access:

    • Right-click the button in Word and choose Copy from the shortcut menu.

    • Minimize Word and return to the Access form you have open in Design View.

    • Right-click in the form’s Detail or Footer section where you want the button placed, and choose Paste.

    • Drag and position the button to the desired location.

      Adjusting the button display in Access:

    • Right-click the pasted button in Access and select Properties.

    • Move the Property Sheet so it does not overlap the button.

    • Locate the Size Mode property and experiment with the available settings:

      • Clip

      • Zoom

      • Stretch

    • When Zoom is selected, the button resizes proportionally, maintaining the height-to-width ratios. However, it may leave a gap around the image. You can fill this background area with the Form’s background color so the gap is not visible when the form opens in Normal View.

  15. If the button is in the Footer Section of your Form, then click on the Footer Section of the Form to select it and display the Property Sheet.

  16. Copy the Back Color Property Value of the Form.

  17. Click on the button to display the Property Sheet of the Button.

  18. Paste the value in the Back Color property copied from the Form.

  19. Change the Special Effect Property to Raised.

  20. Change the Border Style Property to Transparent.

  21. Now you can program your Colorful Command Button like a normal MS-Access Command Button.

    If you look at the Property Sheet of this Command Button, you can see that all the essential Properties and Events are available for Event Procedures, Hyperlinks, Macros, etc.

    I will give you one line of Code to put some life (Animation) into this Button so that it will respond when the mouse moves over it.

  22. Click on the Button's Mouse Move Property and select Event Procedure. Copy the following Code between the Empty Subroutine lines.

     Me.OLEUnbound257.SpecialEffect = 2

  23. Copy the correct name of the Button from its Name Property and paste it to replace OLEUnbound257. Mind the dot separator after the word Me. And at the beginning of SpecialEffect, while pasting the Button Name.

  24. Select the Form's Section (Detail or Footer, or Header) where you have placed the Command Button and display the Property Sheet.

  25. Click on the Mouse Move Property and select Event Procedure, copy and paste the above line of Code with the Button Name change, and paste between the empty Subroutine lines.

  26. Change the Value 2 to 1.

  27. Animating the Button.

    Initially, the Button will be in a Raised Style. When the mouse is moved over the Button, then it will be pushed in (Sunken). When the Mouse is moved out of the Button, it will restore to the raised state. If you repeat this action in quick succession, the Animation will be more evident.

    We will learn some more tricks with Command Buttons.

     What do you think about them?


    1. Command Button Animation
    2. Double-Action Command Button
    3. Colorful Command Buttons
    4. Transparent Command Button
    5. Command Button Animation-2
    6. Creating an Animated Command Button with VBA
    7. Command Button Color Change on Mouse Move

Share:

Double-Action Command Button

Introduction.

Double-Action does not simply mean executing two different procedures with a single click—after all, you could trigger several actions at once if you wanted. The emphasis here is on programming the same command button to perform two distinct actions depending on whether it is being clicked for the first time or for the second time.

In other words, when the button is clicked once, it performs one specific action; when clicked again, it performs a different action.

For clarity, let’s consider a practical example. Suppose a user opens a data editing screen. To protect the data and prevent accidental changes, the screen should initially be in locked mode, making the fields read-only.

When it becomes necessary to edit one or more fields in the current record, the user clicks the command button to unlock the form for editing. After making the required changes, the user clicks the same button again to lock the form back.

Double-Action Command Button – Functional Roadmap

  1. Initial Form State

    • When Form opens or when moving to a different record, all fields are locked for editing.

    • Purpose: Prevents accidental edits, even if the user forgot to relock the previous record.

  2. New Record Handling

    • If the user starts adding a new record, the form opens fully unlocked for data entry.

    • The Double-Action button remains disabled in this state (no locking needed for new entry).

  3. First Click Action

    • Unlocks the form for editing.

    • Allows changes to the current record.

  4. Second Click Action

    • Locks the form again to protect data from accidental changes.

  5. Click State Tracking

    • The system uses a simple toggle:

      • Odd-numbered clicks = Unlock form.

      • Even-numbered clicks = Lock form.

    • Repeated clicking just alternates between locked and unlocked states.

Implementation Steps for the Double-Action Command Button

  1. Open an Existing Project
    Open one of your existing MS Access projects that already contains a data editing form.

  2. Add the Command Button

    • Switch the form to Design View.

    • Insert a Command Button into the Form Footer section.

  3. Set Button Properties

    • Click once on the button to select it.

    • Open the Property Sheet (View → Properties).

    • Change the Name property to: cmdEdit

    • Change the Caption property value (very important) to: Edit

    • Open the Form’s VBA Module

      • With the form still selected, go to View → Code to open the form’s VBA code module.

    • Insert the Code
      Copy and paste the following VBA code into the module:

Private Sub Form_Current()
If Me.NewRecord Then
    With Me
        .cmdEdit.Caption = "Edit"
        .cmdEdit.ForeColor = 0
        .cmdEdit.FontBold = False
        .AllowEdits = True
        .cmdEdit.Enabled = False
    End With
Else
    With Me
        .AllowEdits = False
        .cmdEdit.Caption = "Edit"
        .cmdEdit.ForeColor = 0
        .cmdEdit.FontBold = False
        .cmdEdit.Enabled = True
    End With
End If
End Sub 

This VBA code fully implements your functional roadmap:

  • Form_Current locks or unlocks fields depending on whether the record is new.

  • cmdEdit_Click toggles between Edit and Lock modes.

  • Separate LockForm and UnlockForm procedures make it easy to extend for other control types if needed.

  • If the Caption Value was 'Edit' when the user clicked the button, then the user wants to edit values on the Form.

  • If the Caption was 'Lock', then the user wants to lock the Form after editing the data.

The following code will do the trick. Copy and paste the VBA Code into the Form's Module and save the Form.

The VBA Code

Private Sub cmdEdit_Click()
Dim cap As String
cap = Me.cmdEdit.Caption
Select Case cap
     Case "Edit"
         With Me
          .AllowEdits = True
          .cmdEdit.Caption = "Lock"
          .cmdEdit.ForeColor = 128
          .cmdEdit.FontBold = True
          .Refresh
         End With
    Case "Lock"
        With Me
          .AllowEdits = False
          .cmdEdit.Caption = "Edit"
          .cmdEdit.ForeColor = 0
          .cmdEdit.FontBold = False
          .Refresh
        End With
End Select
End Sub 

Experiment with your design and check whether it works every time correctly as expected.

If any suggestions for improvement or found that it didn't work the way you expected it, then please post them in the comments.

Earlier Post Link References:

  1. Command Button Animation
  2. Double Action Command Button
  3. Colorful Command Buttons
  4. Transparent Command Button
  5. Command Button Animation-2
  6. Creating an Animated Command Button with VBA
  7. Command Button Color Change on Mouse Move

Share:

PRESENTATION: ACCESS USER GROUPS (EUROPE)

Translate

PageRank

Post Feed


Search

Popular Posts

Blog Archive

Powered by Blogger.

Labels

Forms Functions How Tos MS-Access Security Reports msaccess forms Animations msaccess animation Utilities msaccess controls Access and Internet MS-Access Scurity MS-Access and Internet Class Module External Links Queries Array msaccess reports Accesstips WithEvents msaccess tips Downloads Objects Menus and Toolbars Collection Object MsaccessLinks Process Controls Art Work Property msaccess How Tos Combo Boxes Dictionary Object ListView Control Query VBA msaccessQuery Calculation Event Graph Charts ImageList Control List Boxes TreeView Control Command Buttons Controls Data Emails and Alerts Form Custom Functions Custom Wizards DOS Commands Data Type Key Object Reference ms-access functions msaccess functions msaccess graphs msaccess reporttricks Command Button Report msaccess menus msaccessprocess security advanced Access Security Add Auto-Number Field Type Form Instances ImageList Item Macros Menus Nodes RaiseEvent Recordset Top Values Variables Wrapper Classes msaccess email progressmeter Access2007 Copy Excel Export Expression Fields Join Methods Microsoft Numbering System Records Security Split SubForm Table Tables Time Difference Utility WScript Workgroup database function msaccess wizards tutorial Access Emails and Alerts Access Fields Access How Tos Access Mail Merge Access2003 Accounting Year Action Animation Attachment Binary Numbers Bookmarks Budgeting ChDir Color Palette Common Controls Conditional Formatting Data Filtering Database Records Defining Pages Desktop Shortcuts Diagram Disk Dynamic Lookup Error Handler External Filter Formatting Groups Hexadecimal Numbers Import Labels List Logo Macro Mail Merge Main Form Memo Message Box Monitoring Octal Numbers Operating System Paste Primary-Key Product Rank Reading Remove Rich Text Sequence SetFocus Summary Tab-Page Union Query User Users Water-Mark Word automatically commands hyperlinks iSeries Date iif ms-access msaccess msaccess alerts pdf files reference restore switch text toolbar updating upload vba code